Tuesday, February 9, 2021

February Sketchbox - Water Soluble GRAPHITE!!!!!

 Another month, another Sketchbox!!! I must admit, I've been playing around with this box of supplies for over a week now and I'm just HAVING SO MUCH FUN!  More on this later!  

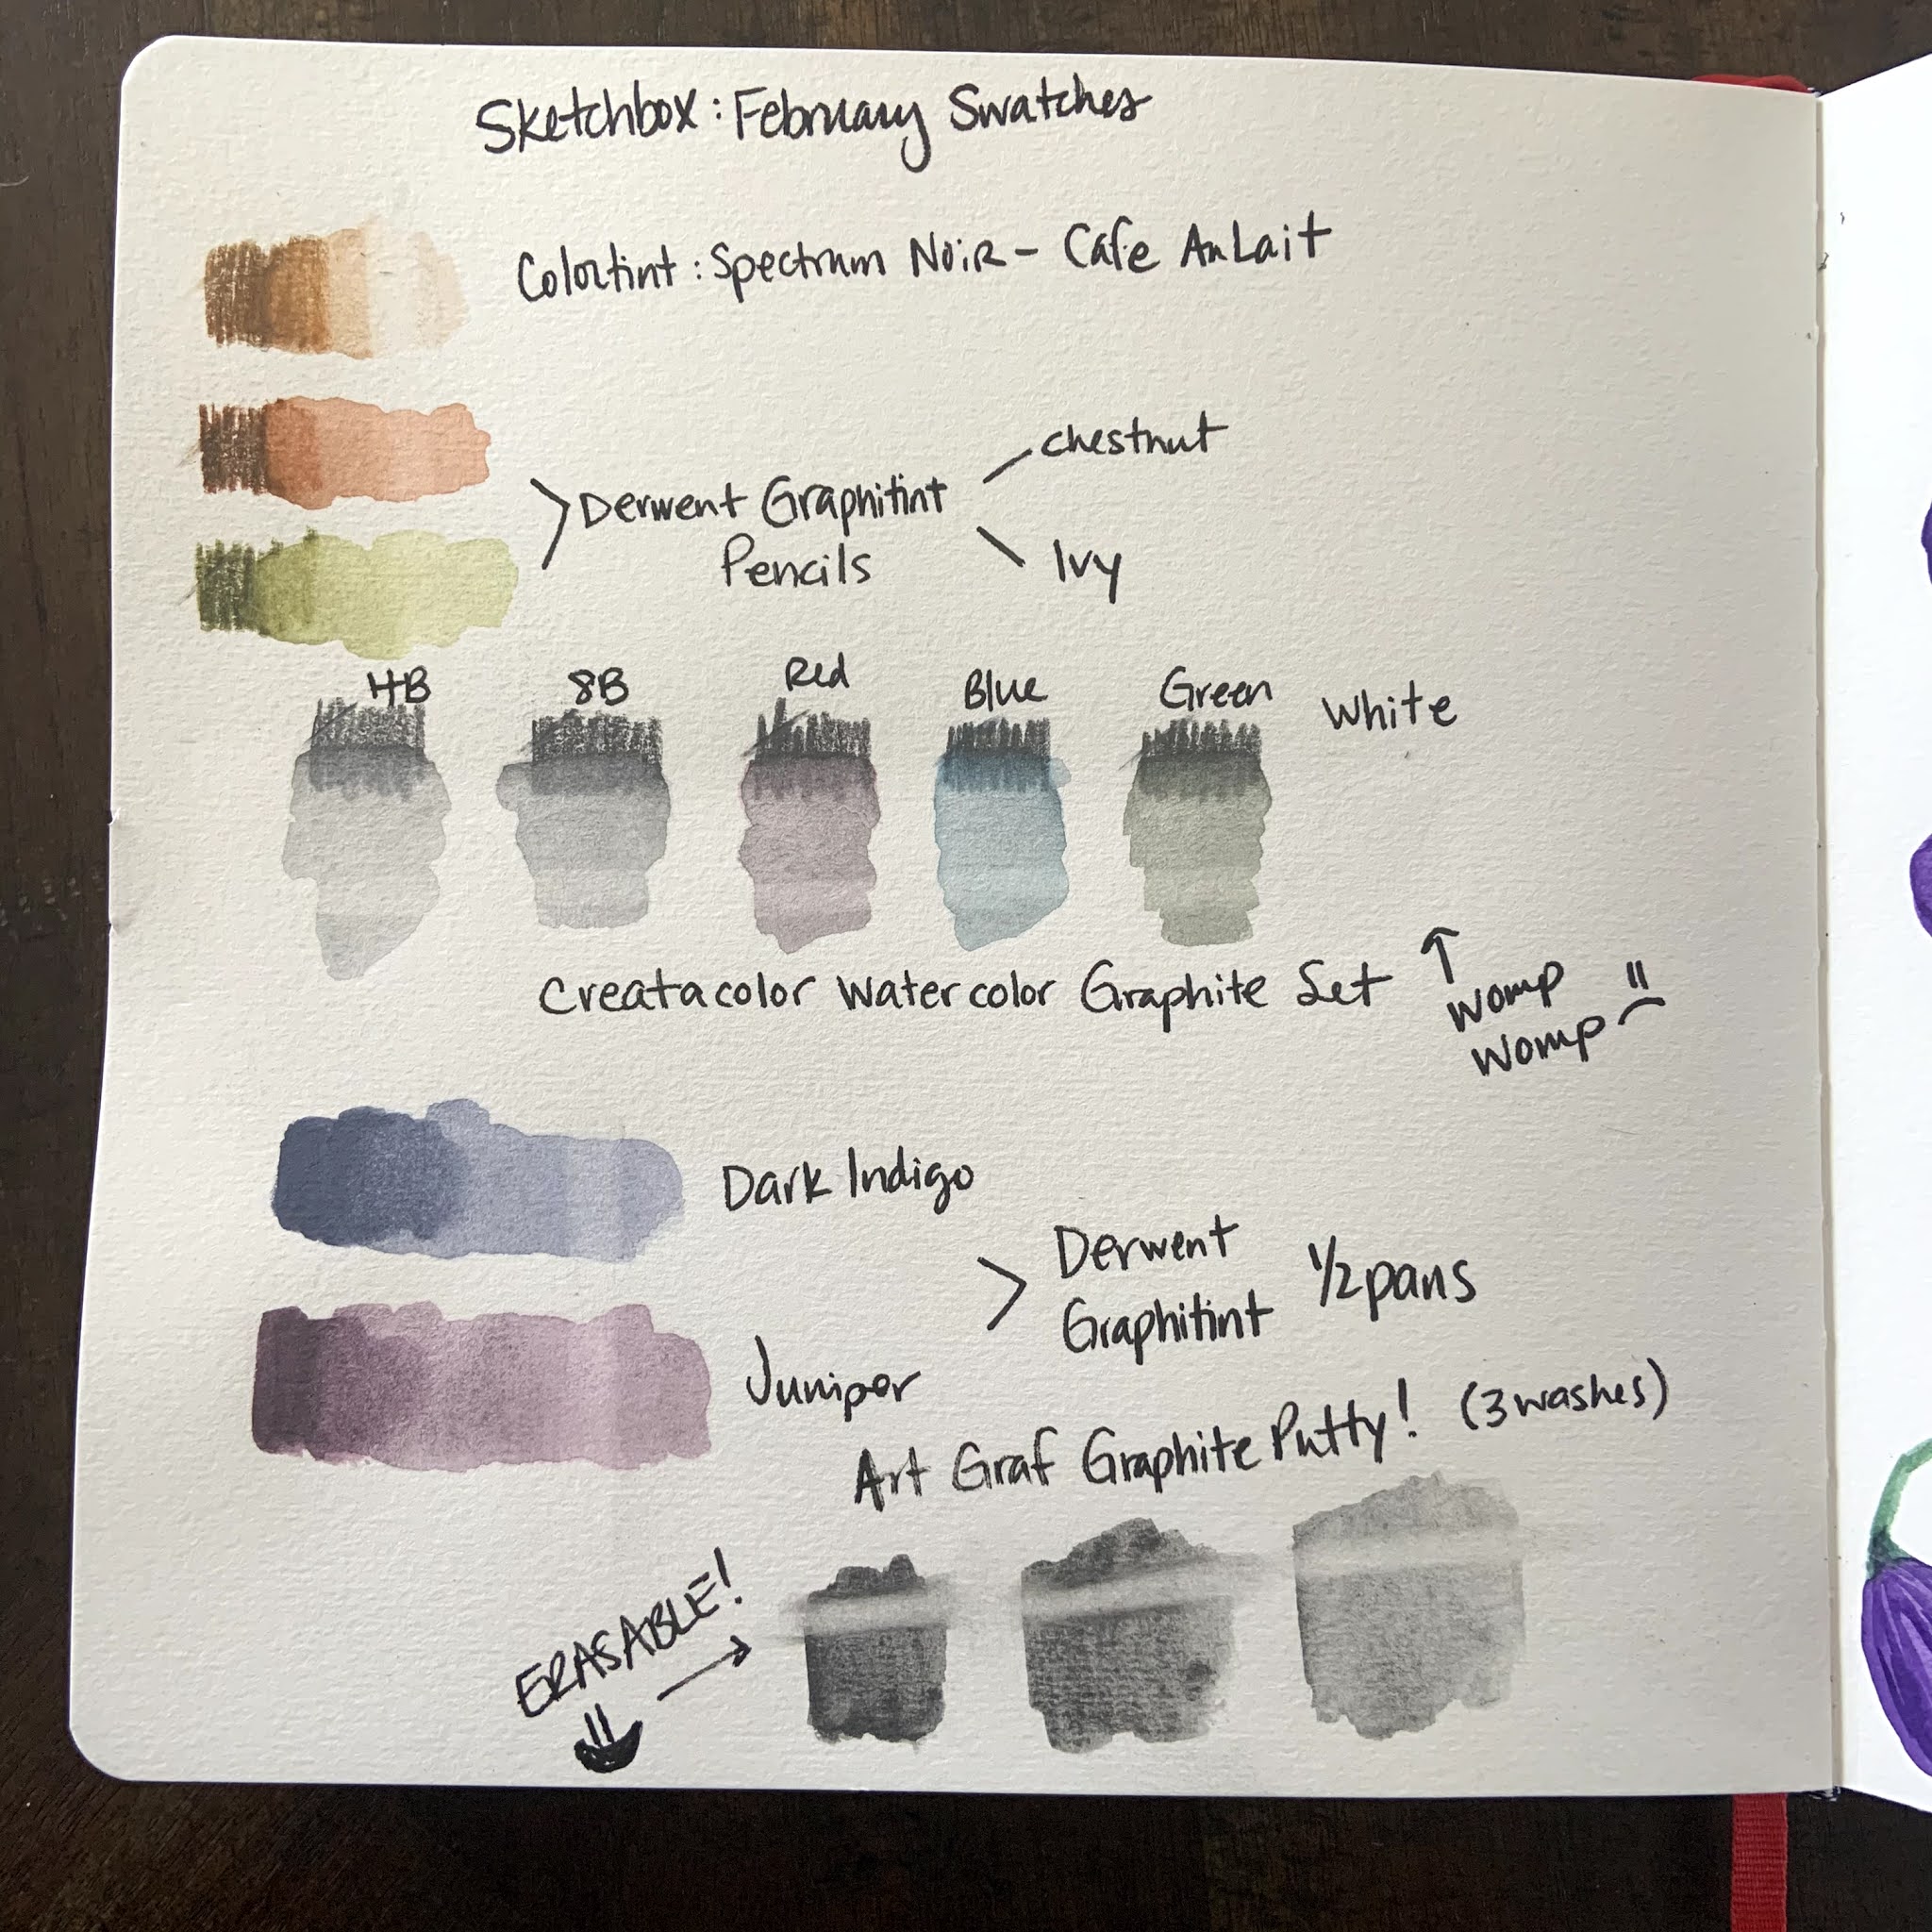
Let's start with swatches, what's in the box, and my thoughts on each item in the box:  

Supplies: 

  • Princeton Heritage Brush - Round #6 
    • This is a beautiful paintbrush.  I enjoyed using it very much!  Valued at $14, I would have settled for something a little less expensive if it meant getting an eraser in this box. 
  • Derwent Graphitint Half Pans - Dark Indigo and Juniper
    • These. Are. Amazing!  I have seen people use these online before, but I was NOT prepared for how awesome they are!  I really want the whole set now!  The colors were beautiful and granulated so nicely.  They of course are the quality I expect from Derwent.  These erased a bit, but not completely. 

  • Derwent Graphitint Pencils - Ivy and Chestnut
    • These were also pretty darn awesome!  I loved the colors and they dissolved quite nicely when using water on them.  These erased a bit, but not completely.  

  • Spectrum Noir Colortint Pencil - Cafe Au Lait
    • This was a nice pencil as well!  I didn't love it as much as the Graphitint pencils, but it was still a nice, dissolving pencil and it was great to have two different browns to create nice contrast.  This pencil *did* have a more clean erase than any of the Graphitint products, which was great.  

  • ArtGraph Drawing Graphite Putty
    • I was terrified of this package when I saw it.  I waited DAYS to open it.  When I opened it, I used a tiny scoop to take a VERY small amount out into my palette.  As soon as I put the paintbrush to it I was IN LOVE!  This stuff is literally liquid graphite.  I loved being able to use graphite like paint.  But THEN the best part - YOU CAN ERASE IT!  That's right!  It takes a little more to erase than dry pencil, which is perfect because you can draw on top of it and do a light erase without messing up the under layer, but you can also erase it to create highlights!!!!!  WHAT!?!?!  This is the star of the box, and I'm so excited to use it in the future too! One small thing I'd wished was that the plastic bag had a zip top instead of a tear open top so that I could easily keep it sealed.  But this stuff was AMAZING!  

  • Cretacolor Watercolor Graphite Set, 6 pc
    • Finally, these were decent!  I LOVED the two graphite pencils, the blue and the green.  They were high quality.  These pencils dissolved decently well and they erased pretty well too.  BUT, the red was weak, and was almost the same color as the juniper Graphitint so it didn't really get used much in my piece.  And the white, the white was absolutely useless.  It didn't layer over anything, it didn't write over any of the other graphite, and I didn't use it at all.  I even tried to scribble a bunch of it out and pick it up with a paintbrush to go on the top of the other graphite, and it did... nothing.  I'd much have preferred a 4 piece set here and a swap out for those two pencils for an opaque white medium.  
Quick Notes: 

  • We didn't get paper this month.  I'm totally fine with that because the value of the rest of the box was great!  Also - Sketchbox has sent plenty of wet media paper in recent boxes, so everyone should have something to put their art on/in.  
  • I definitely benefited from having the Caran D'Ache Palette Aquarelle.  (Palette pictured below.) This is a palette with a smooth side and a rough side, designed to scribble out pencils and pick them up with a wet brush.  It is easily the best $11 I've ever spent on a palette.  I'd HIGHLY recommend it if you ever use watercolor pencils!  
  • I used the TINIEST bit of graphite putty!  I have a picture of the palette I used for that so you can see that a little really does go a long way with that stuff!  

Caran D'Ache Palette Aquarelle and my Palette with the Graphite Putty

Box Value: Sketchbox values this box at $52.93 and I have to say it's definitely worth my money!  I will use 90% of what's in this box over and over again for a long time to come.  The *only* thing I would say is that the Creatacolor red and white weren't very useful, and I would have traded them out for a nice eraser and a white opaque medium that actually layers over the graphite.  

That being said...  

This box was AWESOME.  This is exactly what an art subscription should be and should provide.  I would *never* play with graphite on my own accord, but give me graphite the works like watercolor and BAM - I'm pricing out Derwent Graphitint everything online!  And that graphite putty is one of the coolest things I have ever gotten in an art box.  GREAT JOB Sketchbox!  

What did I draw? I knew *immediately* when I saw how the graphite putty worked that I had to draw a statue!  And so of COURSE I drew Hylia from Skyward Sword!  I knew right away that the indigo Graphitint would look amazing as a dark sky.  I also used the pencils and half pans to create a cobblestone path.  I used both green and brown pencils to create the trees, that turned out whimsical just like the trees from Skyward Sword.  I used a combination of wet and dry graphite for Hylia herself.  I'm so very pleased with how this piece turned out!  

Have you ever played with water soluble graphite?  What would you make with this Sketchbox?  Let me know in the comments below! 

Saturday, February 6, 2021

DIY - Easy, Fun Valentines Wreath!

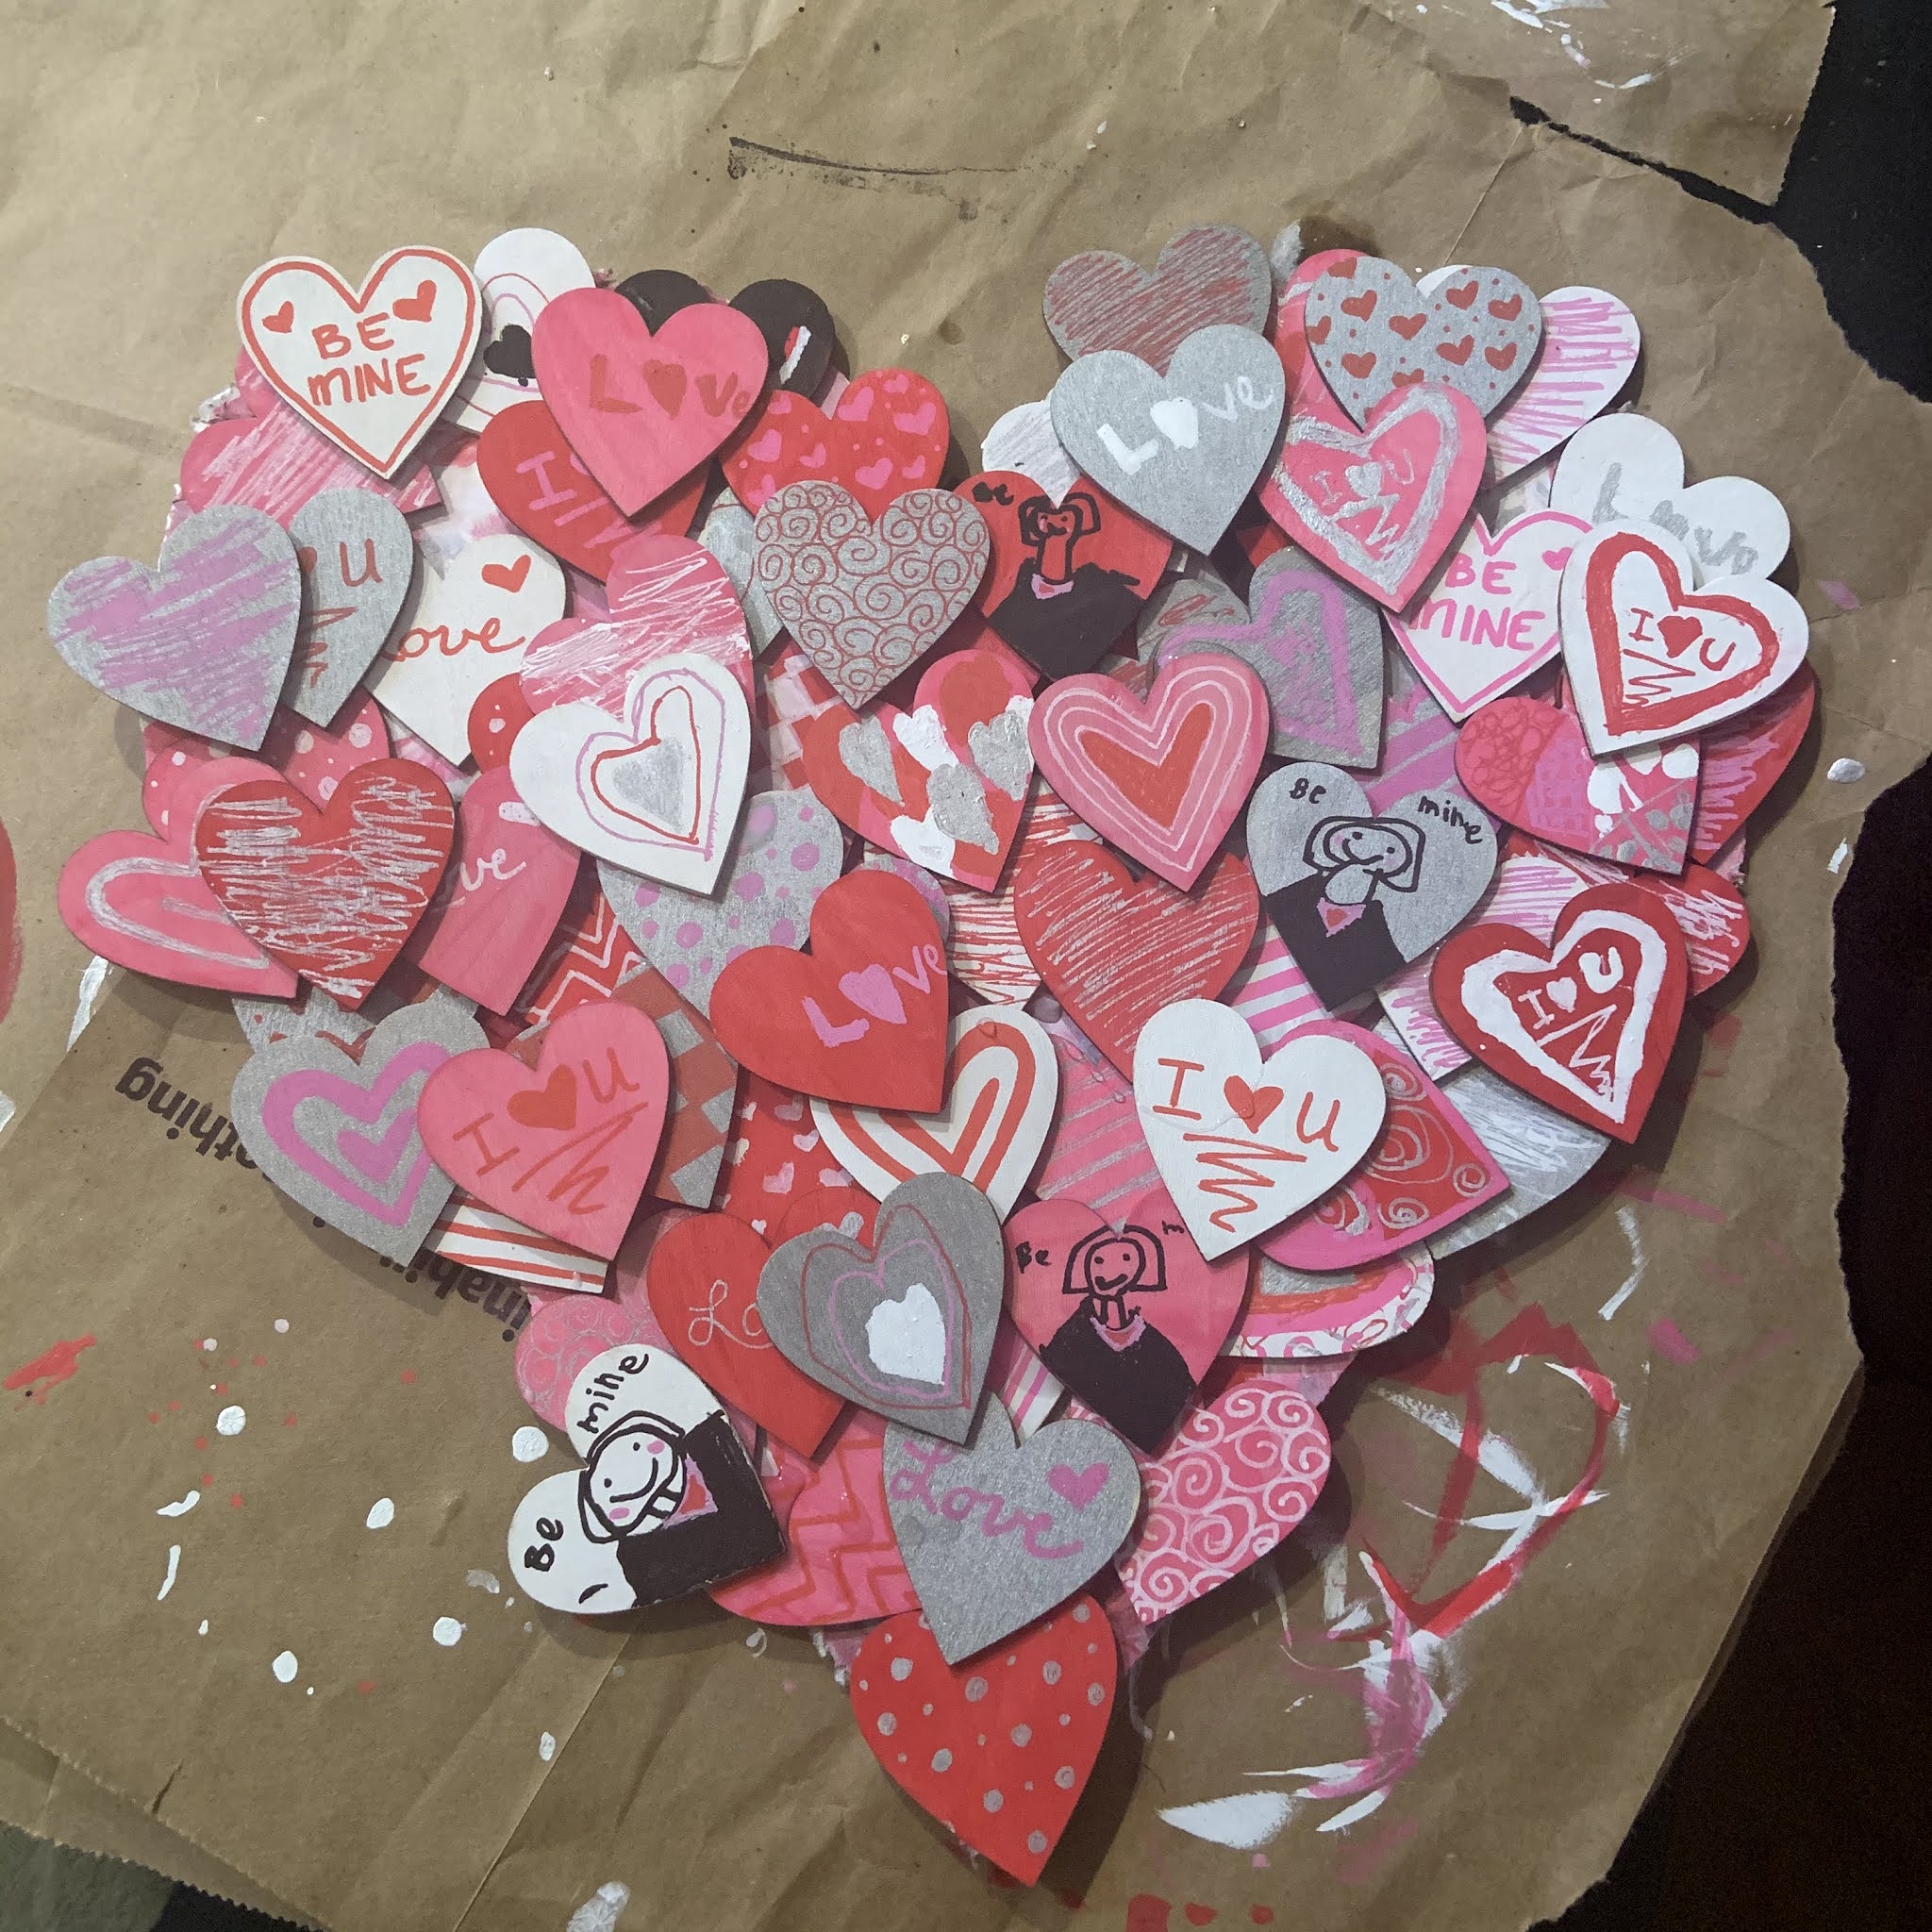
 What's up everyone!  So as Valentine's Day is *rapidly* approaching (checks status of Valentine gifts.... realizes she needs to send them NOW...), I wanted to share a fun, easy DIY project that my daughter and I did together.  We made a Valentine's Wreath out of wooden heart pieces and cardboard!  

Supplies for the Wreath: 

  • Wooden Hearts we used these from Amazon, $13.99.  We used about 2/3 of the hearts for our wreath.  
  • Red, Pink, White and Silver Craft Paint $3.20 ($0.79 each at Michaels)
  • Washable School Glue - $0.85 at Target, but we already had glue
  • Paint Brushes  - you can get a whole set of these for about $1 lots of places
  • A Large Cardboard Box
  • Craft Knife or Scissors
  • Ribbon
Optional: Paint or Posca Pens for decorating.  You could just as easily decorate these with the craft paints from above, but we used paint pens.  

Total Cost: $19.09 (or less depending on what you already have at home)

We started by painting about 80 of the wooden hearts solid colors (20 of each).  We let these dry overnight.

I then cut a heart out of an old cardboard box.  The dimensions ended up being about (enter dimensions here). Then, we splotched paint all over the heart so that the background wouldn't just be blank cardboard.  You *could* use wood for this step, but we are keeping our wreath inside in a temperature controlled part of the house, so we just used some leftover corrugated cardboard.    

Next, we took the hearts and made all kinds of designs on them!  Again, we did this step with paint pens, but you could just as easily do this step with the craft paint if that's what you have.  Some of them we made to look like conversation candy hearts, others we made with fun designs, and we also added a few with our names on them to personalize it!  Here's some of the decorating process.  


After the hearts were designed and dried, we started to glue them onto the wreath.  We tried to cover as much of the bottom layer as possible, and we let the layers dry a bit in between adding them.  We saved all of our name hearts for the very final layer.  This is the next to last layer: 


Finally, we used some duct tape and ribbon to make a hanger for the wreath.  You could also glue the ribbon to the back of the wreath, but our ribbon was thin and duct tape and knots kept it on the back quite securely.  The final product is hanging here on this door.  

This was a fun project that my daughter and I enjoyed doing together!  It took a few days because of all of the paint drying, but each step went pretty quickly so it was nice to fill some of our daily gaps with an art project.  I hope this inspired you to make something fun and personal with your kids!  Do you have any fun art traditions with your family?  Let me know in the comments below!  

Tuesday, February 2, 2021

2021 Bullet Journal Journey - February

Happy February everyone!  This month, I really had a good time setting up my bullet journal!  I used pinks and purples (super bright and traditional) and tried to have fun with it!  

Here's the first two pages for February.  I know this is a bit busy, but I really like how it turned out!  I wanted the hearts to feel like little bubbles all over the page!  I use the goals page to plan blog entries, track my creative time and healthy choices, and to list overall monthly goals.  

Next, is the calendar spread.  I made this two pages instead of one this month, and I like it much better!  I also have a little spot for notes there in case there's anything large I need to write down.  I also continued my design from last year's journal of adding a strip of abstract watercolor that matches the month's theme.  I really enjoy doing these abstract strips and use the leftovers as bookmarks to keep or gift!  

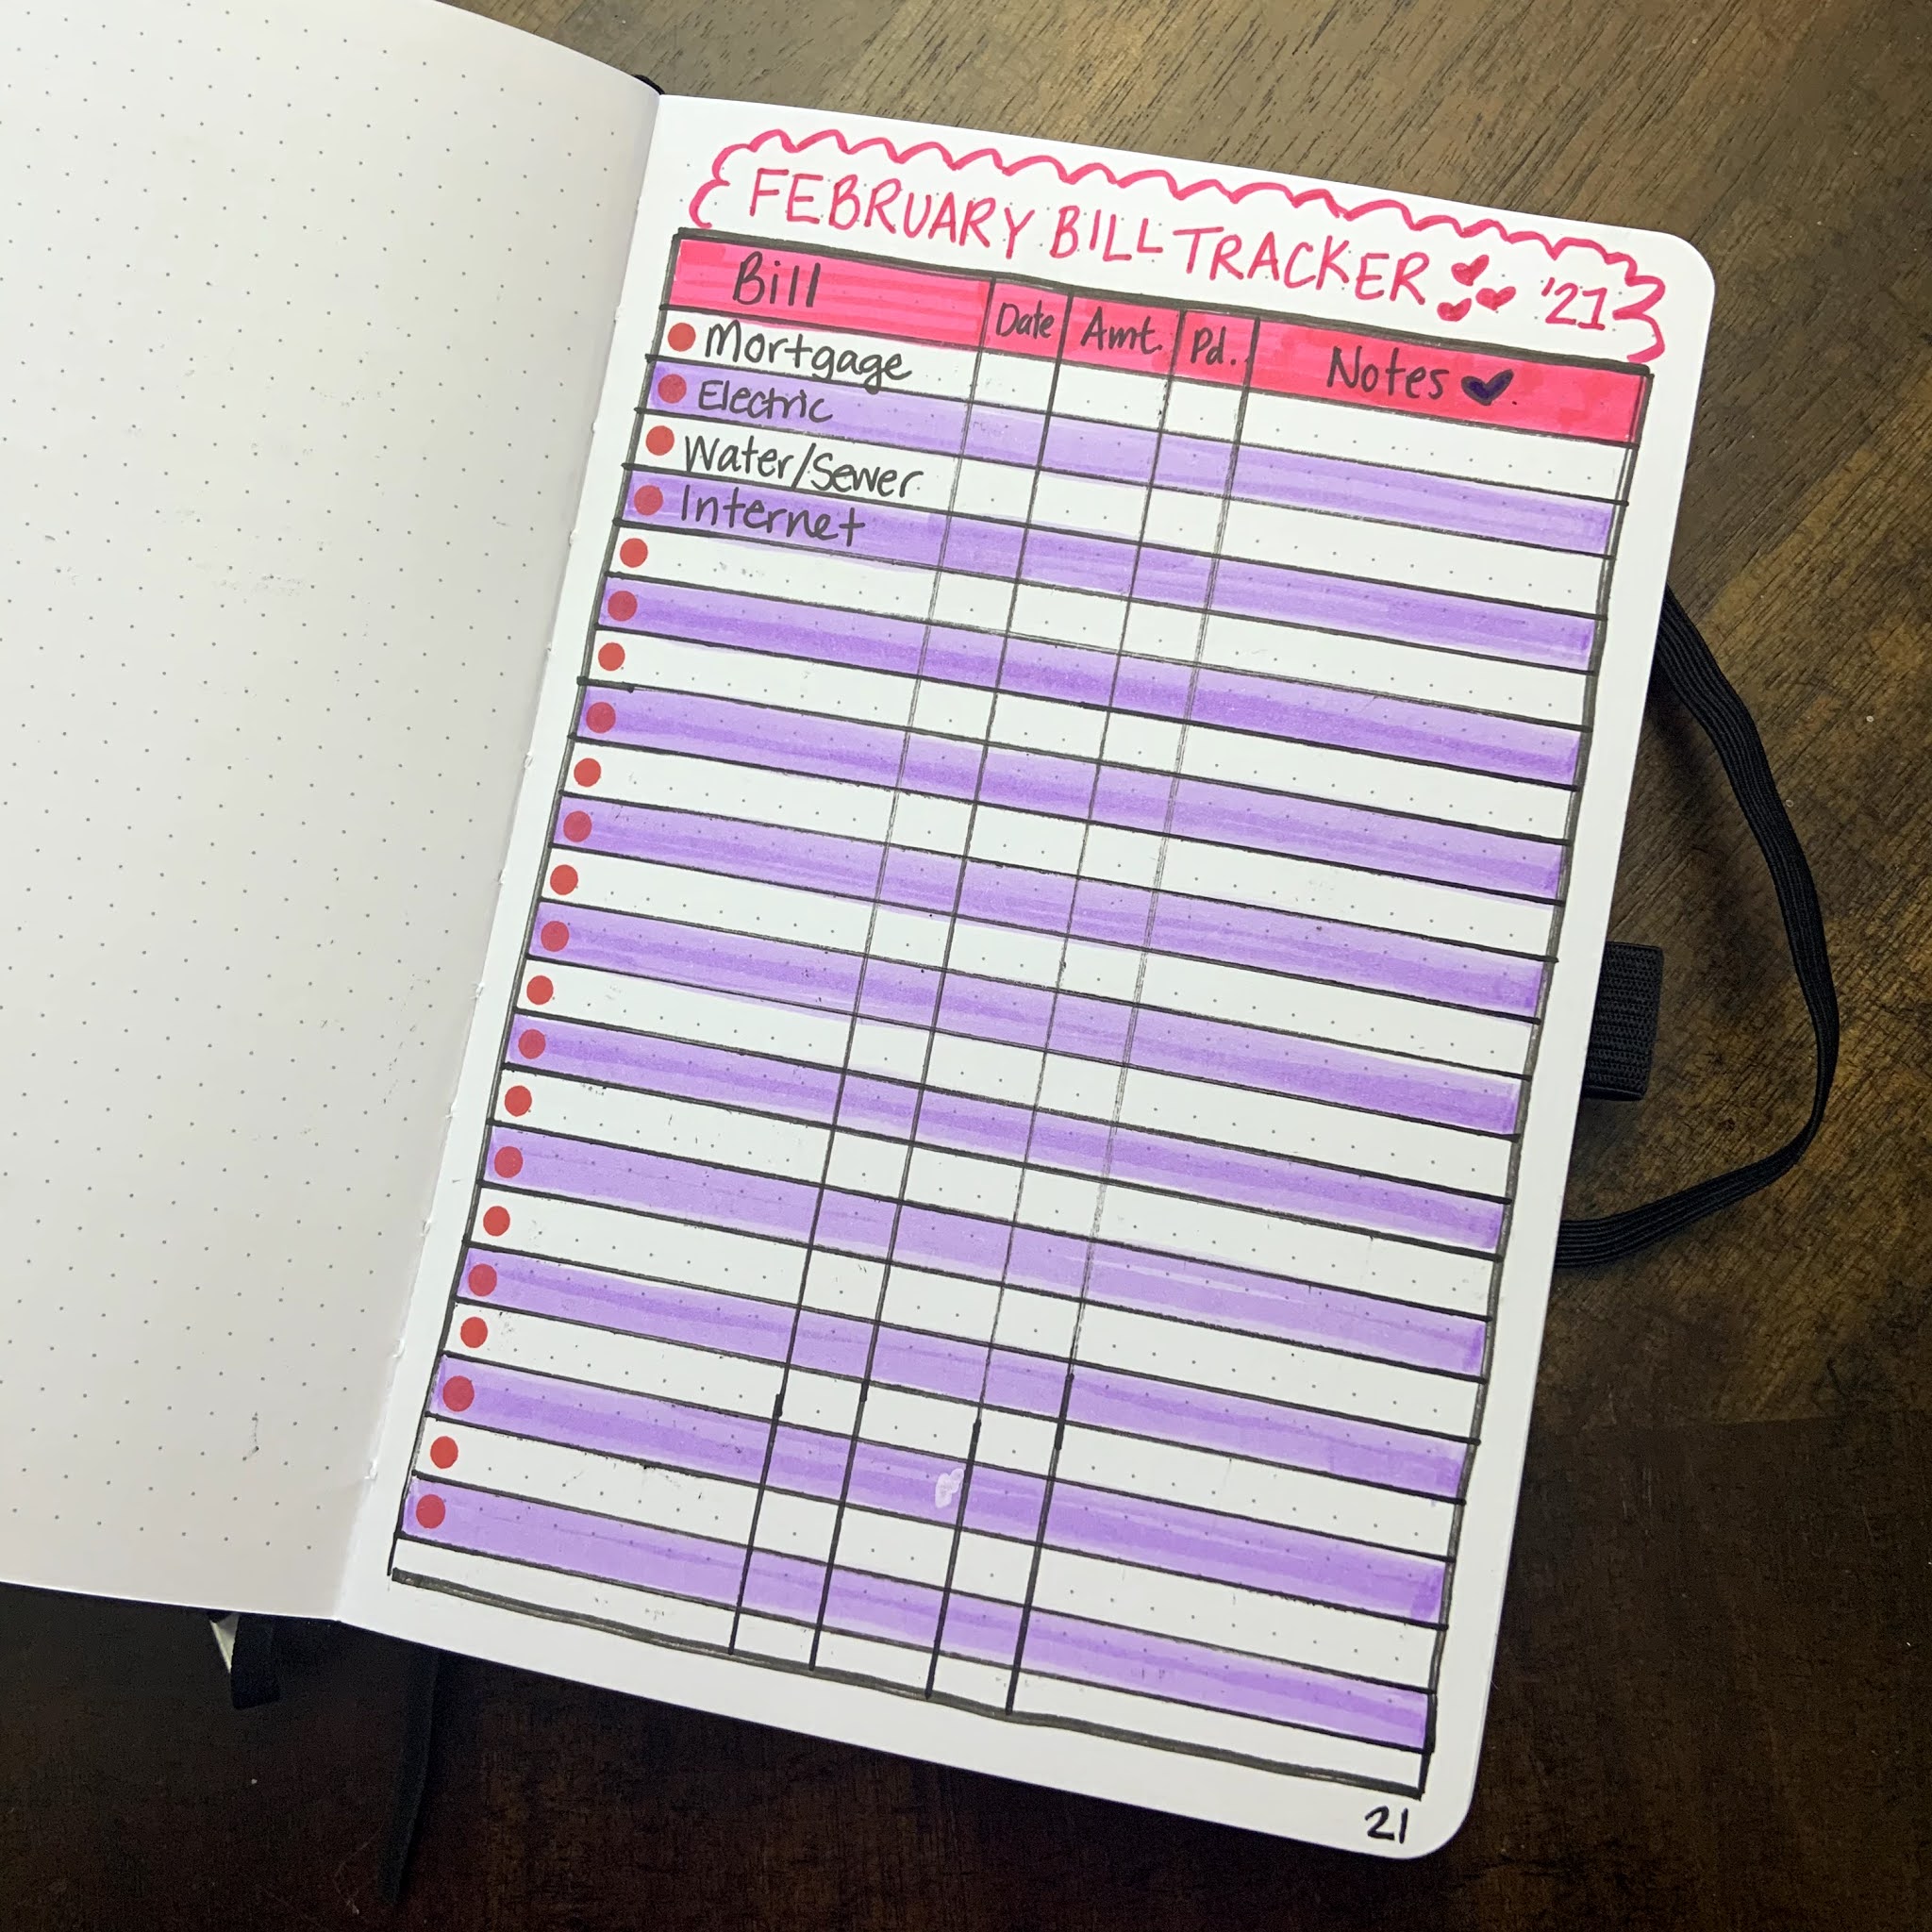
Then, I hand-draw a mood tracker and a bill tracker each month.  Here are pictures of each one!  I really love how the mason jar of hearts turned out for the mood tracker - so cute!  


I have more bills than this - but for privacy's sake I took the picture at this point before I wrote the rest! 

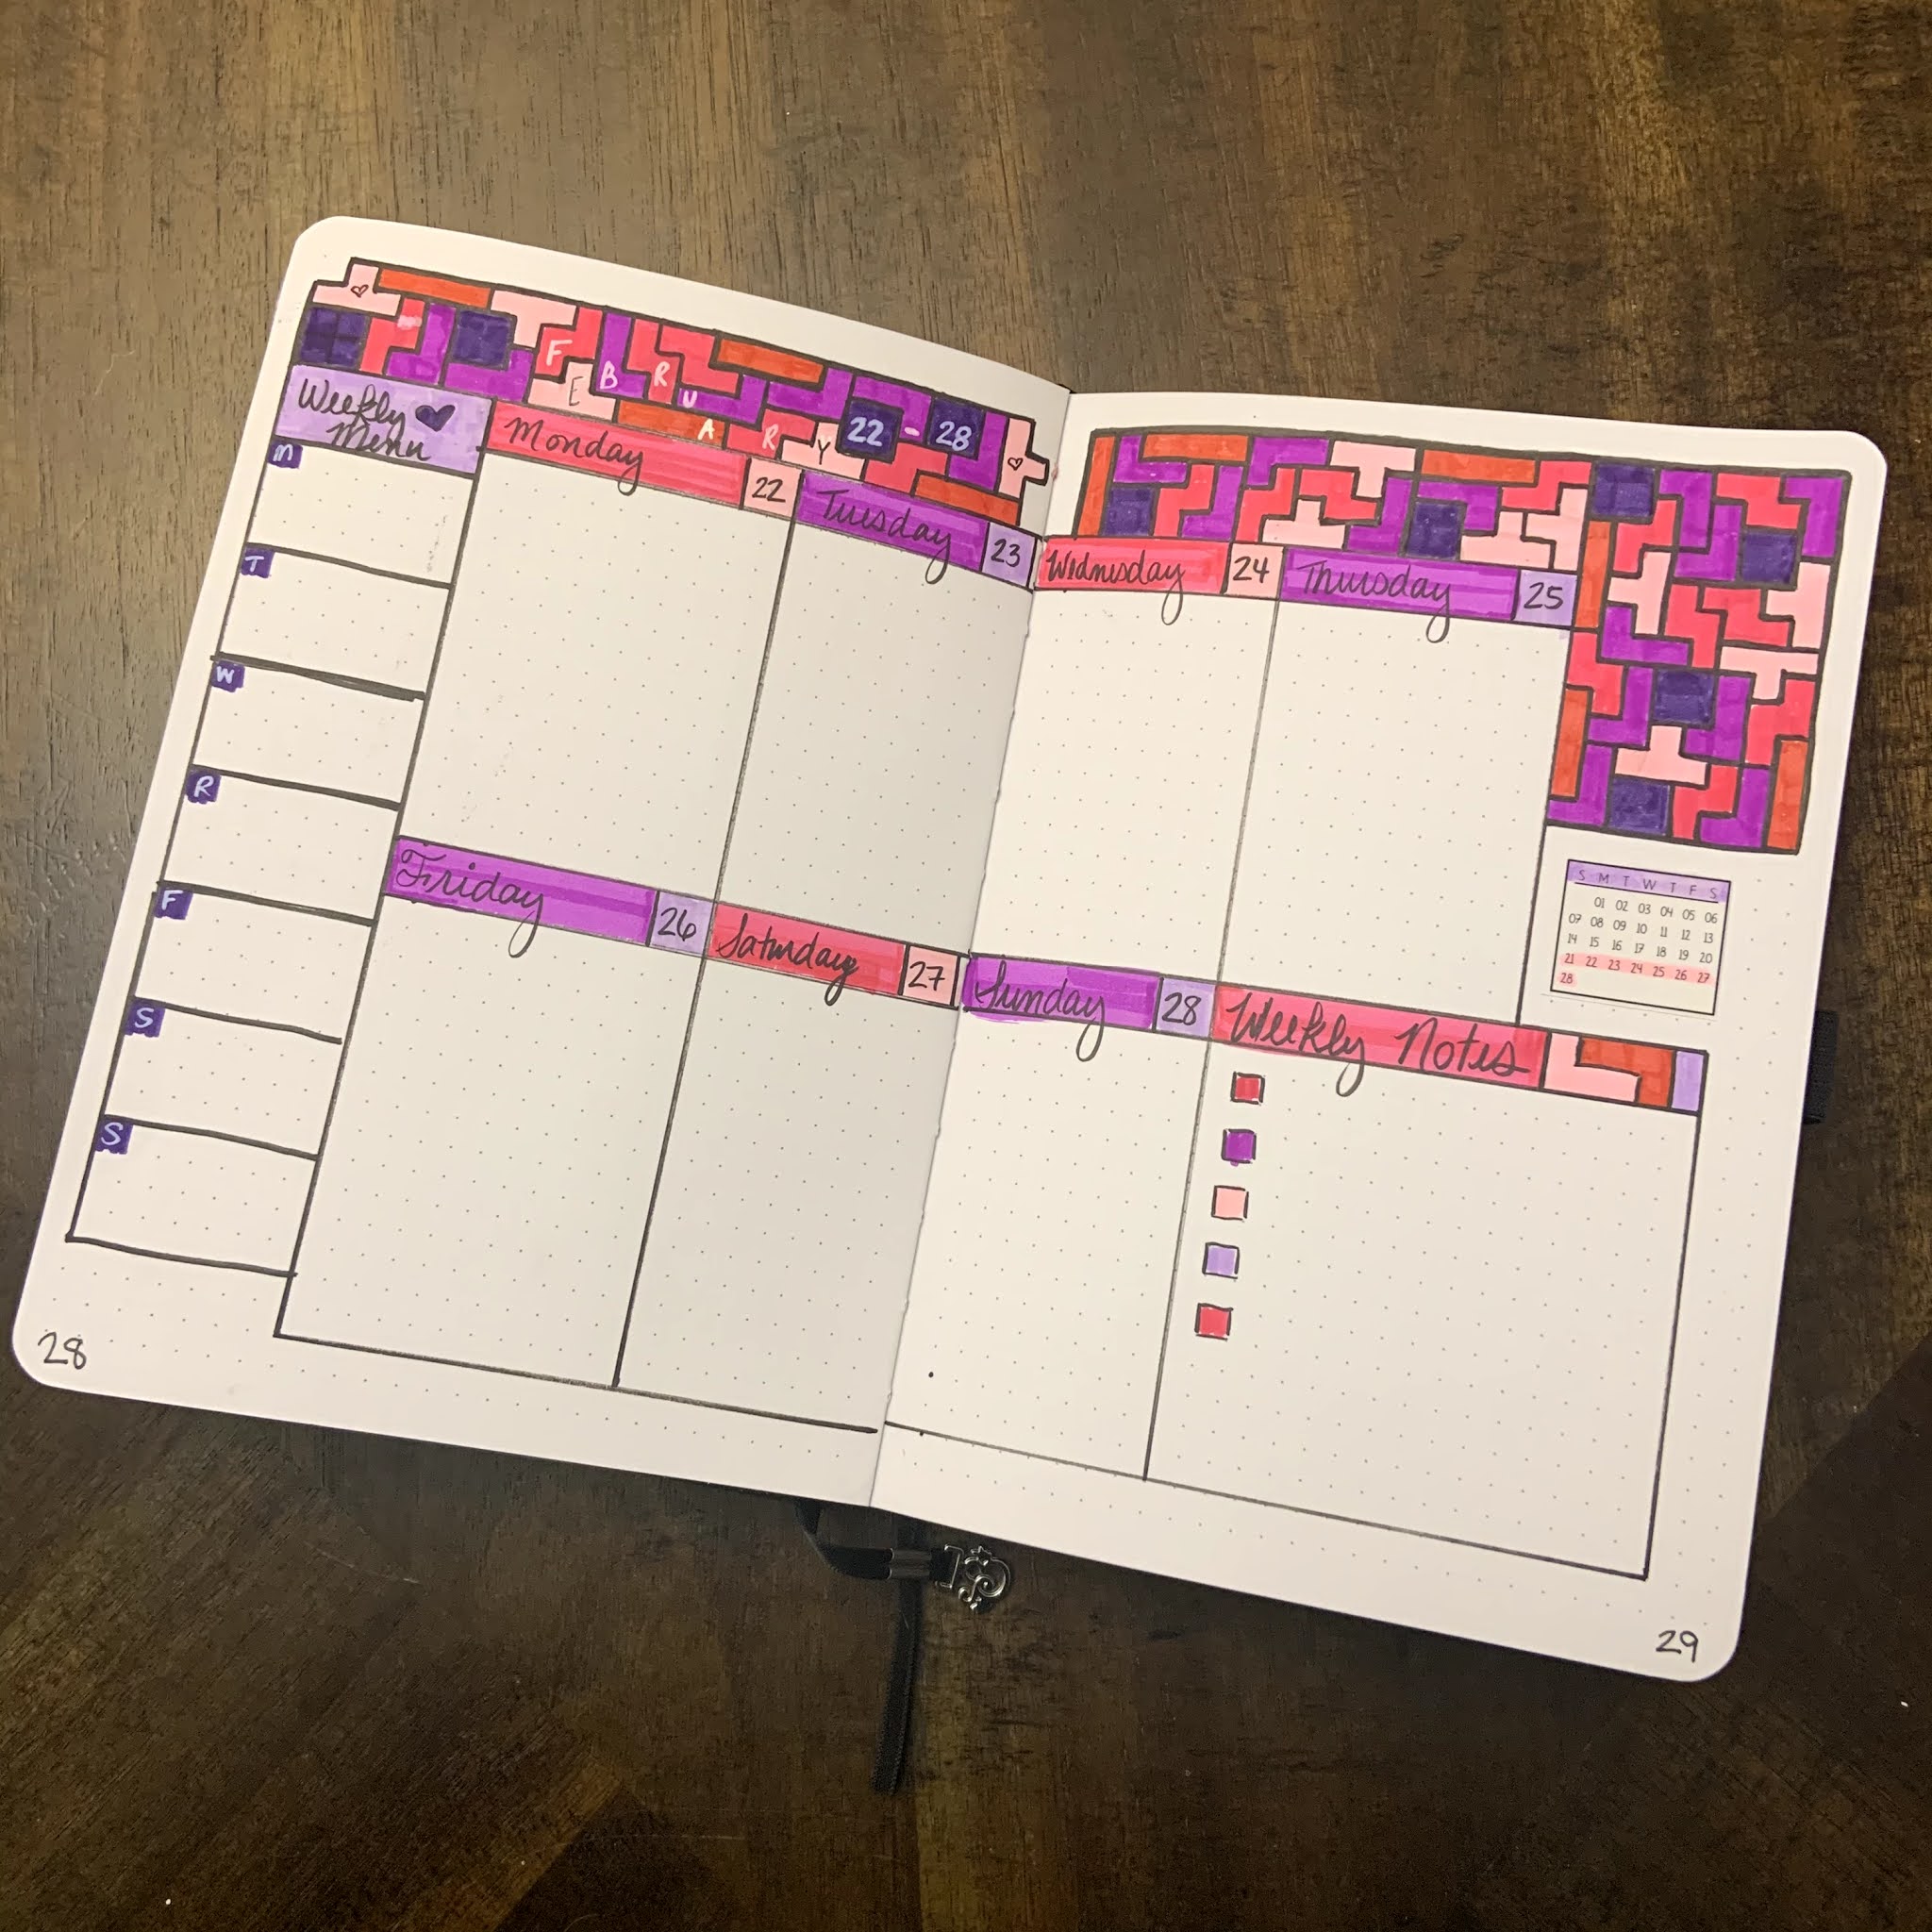
Finally, I'm including my weekly spreads for this month!  I'm not sure I will include these every month, but I really loved how these ones turned out.  I've settled on a weekly spread that I really like right now, it has a box for each day plus a larger one for notes, and a column on the left for our weekly dinner planning. This month, each week had a little theme: 

Wk 1 - Violets (February flower of the month) 


Wk 2 - Watercolor Hearts


Wk 3 - Stripes and Dots
Wk 4 - Tetris

....and that's it!  I hope you guys enjoyed seeing this layout!  Do any of you use a bullet journal? What was your theme of the month for February?  Let me know in the comments!!  

Saturday, January 30, 2021

Etchr Sketchbook Review - The Paper of my Dreams!

I have wanted to try these sketchbooks from Etchr for awhile, and I was so excited to get them for Christmas from my lovely husband!  These are the Etchr Cold Press Mixed Media Sketchbooks in A4, A5 and A6. 

2 of the 3 Sketchbooks

These sketchbooks are thinner than traditional watercolor paper at 230gsm, BUT they are 100% cotton watercolor paper and claim to be double-sided!  This all seemed too good to be true, 100% thin cotton paper that lays flat and was ALSO double sided?  Could it be true?  

So, my first test was to see how flat the book lays.  I must say, for a hard-bound sketchbook that the paper does lay *very* flat.  It's not as flat as a wire-bound sketchbook, but with binder clips or washi tape I don't have any problem working in these sketchbooks.

My second test was to see how well the 100% cotton paper performed with wet on wet techniques and blending.  Succulents are my comfort zone when it comes to watercolor painting, and so I used this succulent picture as my test.  I was IMMEDIATELY in LOVE. This paper stays wet a long time for beautiful blending, and doesn't unexpectedly lift or pill under multiple layers.  I had two more tests to check the paper's abilities, but so far I was SUPER impressed!  

My third test was to see how well this paper did with a full background wash.  I did not hold back to wet the background.  I also had the edges taped like I would for any wet technique in a sketchbook, but the warping was minimal considering the thinness of the paper.   The washes went on beautifully and create beautiful gradients.  The second picture took 5 layers, all washes and there was no pilling or unexpected lifting.  The more I use this paper, the more I LOVE it!!!  


My final test of the paper was to use both sides.  I specifically wanted to use two pages with serious washes on both of them to see what would happen. As you can see in this video below, there was absolutely NO ghosting, bleeding, anything!!!  IT IS MAGIC. I mean, HOW they managed to make this paper has to be sorcery!  Also - this video shows a small sneak peak of a few other pieces I haven't shared yet!  


So the question becomes, is it worth the price?  In my opinion, they are ABSOLUTELY worth the price!  Per book, they aren't much more than the Bee Creative books that I buy, AND they are hard bound and the paper is double-sided!  Also, Etchr now sells individual books on Amazon so you don't have to buy 3 at a time!  For a long time, having to buy 3 books deterred me from buying them for myself, but now being able to buy 1 to try I wouldn't hesitate AND I feel they are definitely worth the money!  

Needless to say, this paper has 10/10 stars from me.  It will most likely be my primary watercolor sketchbook going forward.  I love working on paper that works like Arches or Bee in a beautiful, bound, easy to carry sketchbook.  I *have* seen that Etchr has paper blocks, but to my knowledge those blocks are only 50% cotton. I'm really hoping they will make 100% cotton cold press blocks in the future - I would DEFINITELY trust this company to make quality 100% cotton blocks!!!  

I hope this review was helpful to anyone that is thinking about trying this product!  Have you tried any Etchr products?  Let me know your thoughts in the comments!  

Wednesday, January 27, 2021

Quick and Easy Valentines Part 2!

This past weekend, my lovely daughter and I sat down in our craft room to get inky and make some Valentines!  

I know a lot of people dislike Valentine's Day, but truthfully I've always looked at it as a day share the love with everyone in my life!  I usually make about 20 valentines to send to friends and family. Because of the proximity of Valentine's Day to Christmas, I never want to make anything that is TOO complicated when it comes to these cards!  So these cards are all very similar, small, and clean in design.  

Another note about these projects - everything I'm using here is at least 5 years old!  I love my Valentine's stash and I've been using the same one I stocked YEARS ago - so please feel free to use what you have!!!  I'm really trying to not spend much money this year on paper crafting and to focus on finding love in the products that I have!  


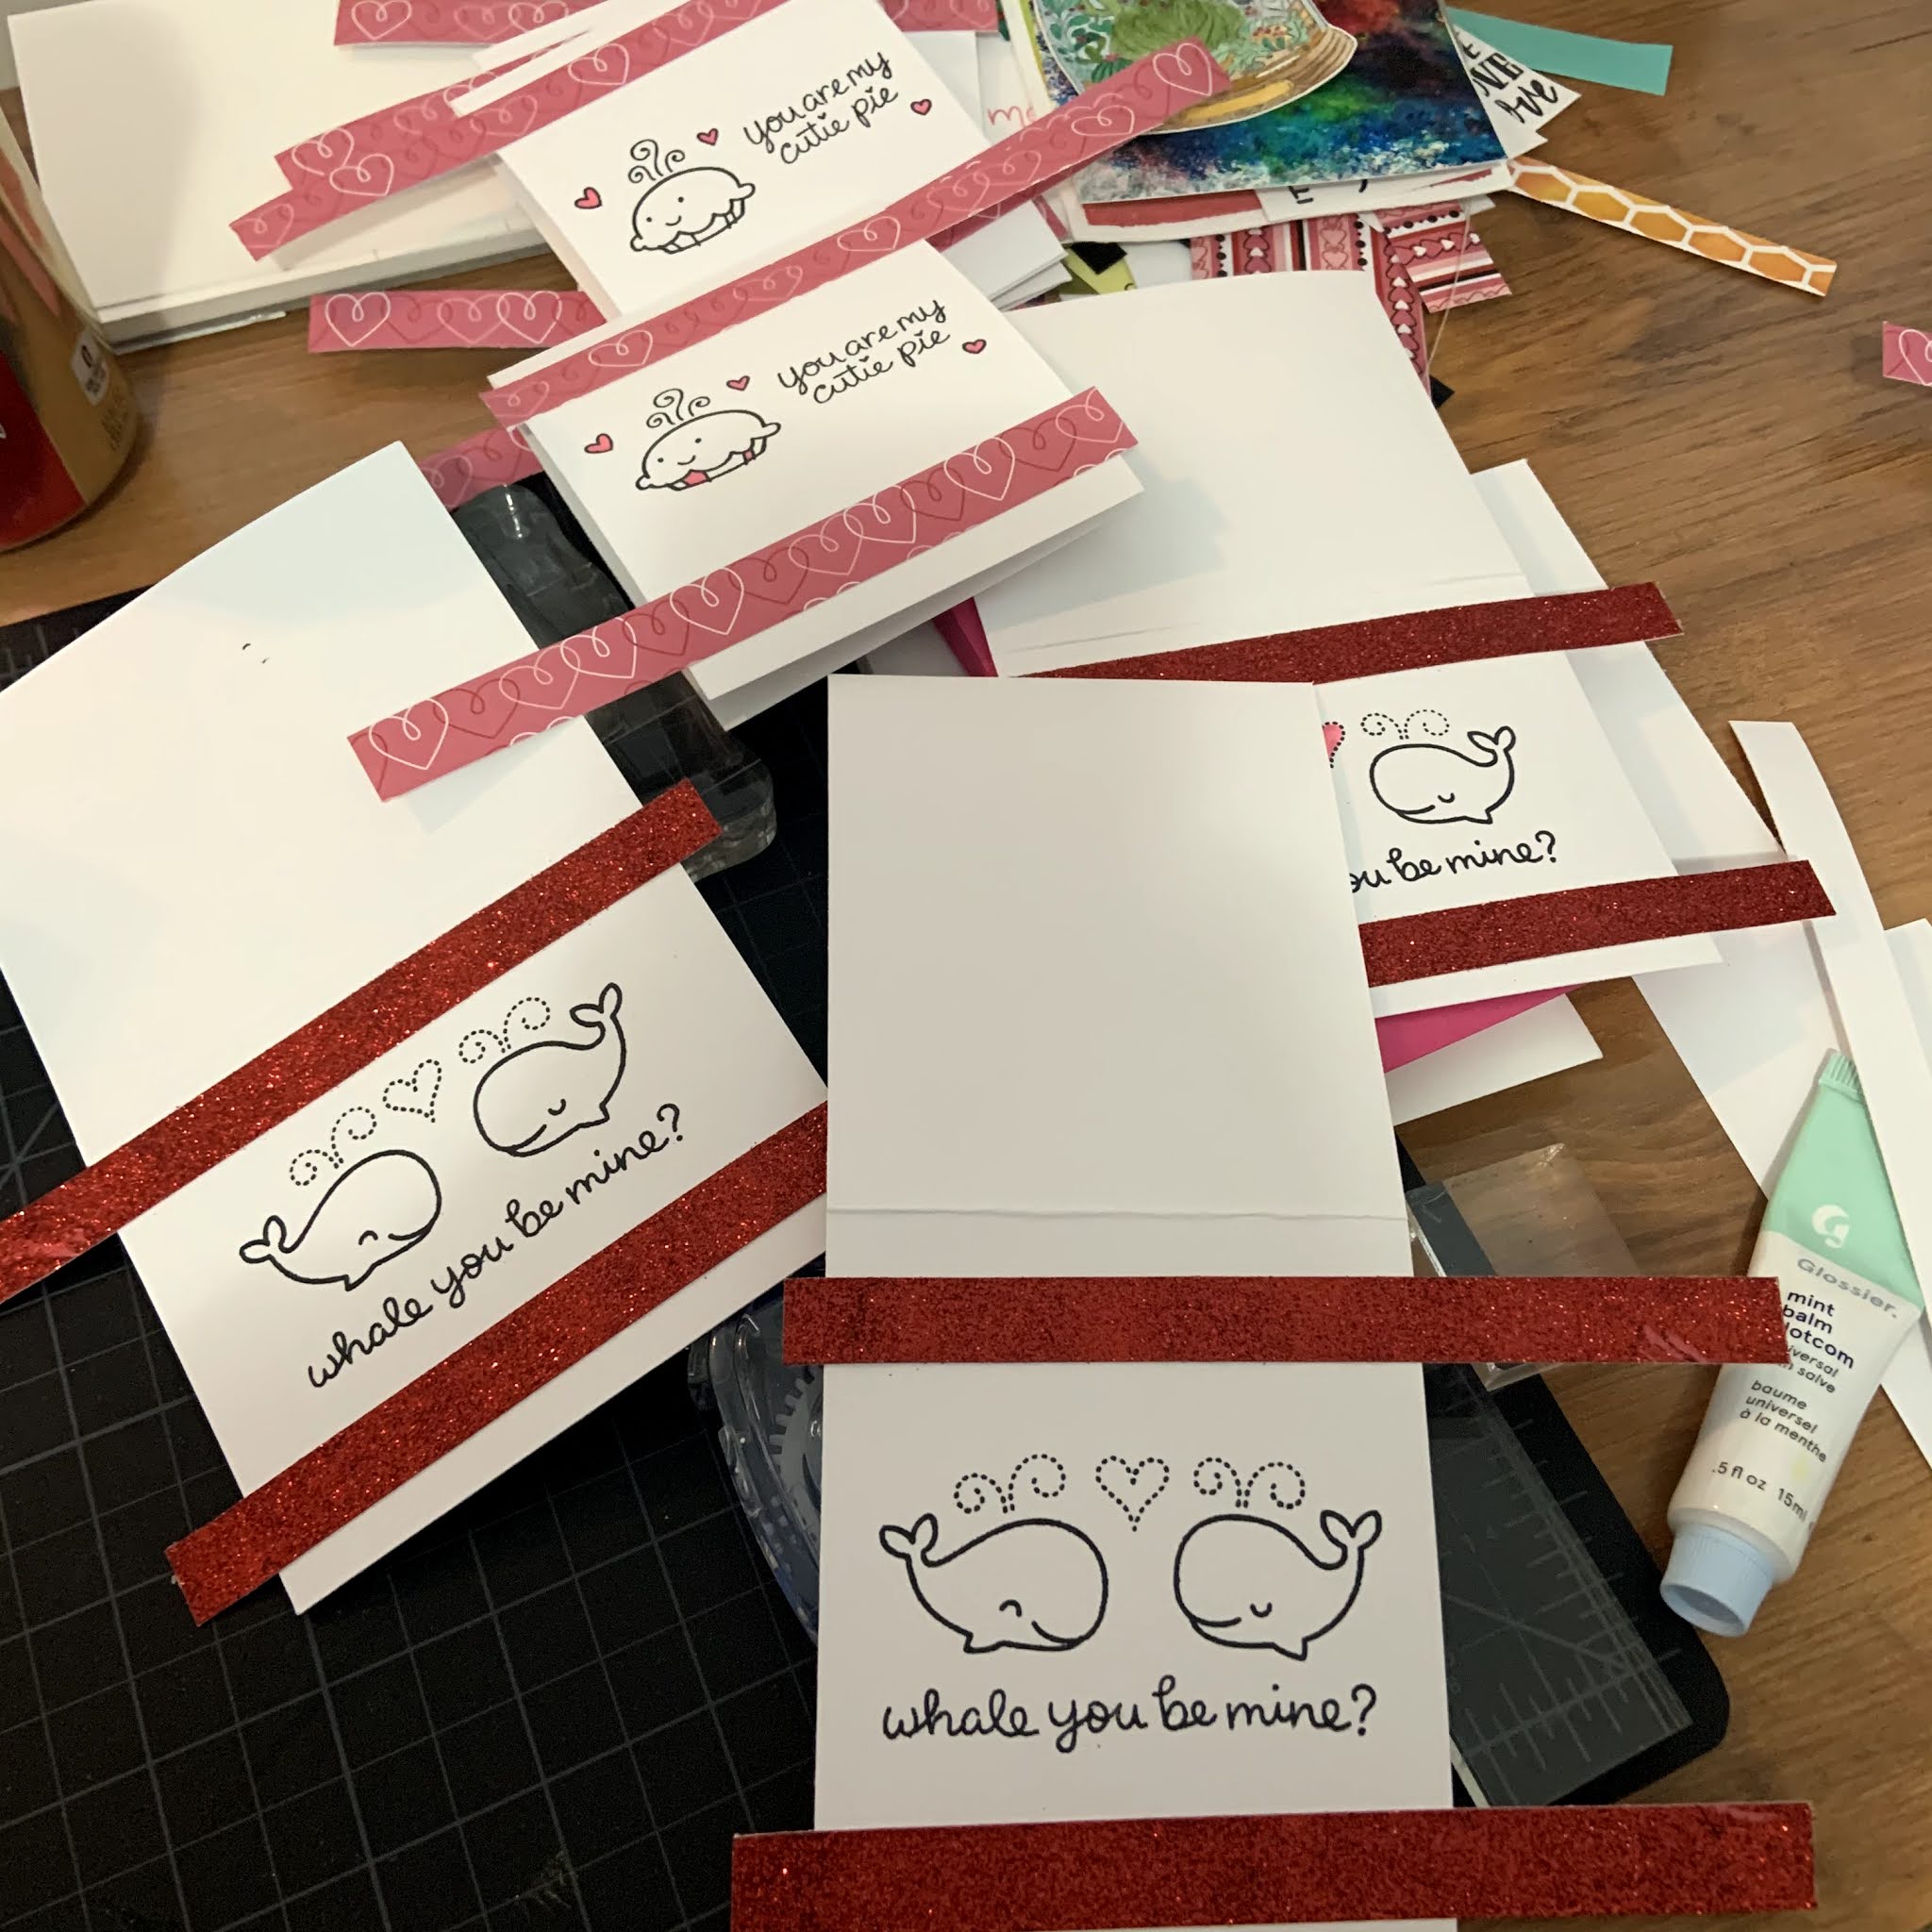
These cards are 4-bar size.  I used two Lawn Fawn sets that I enjoy: My Silly Valentine and Whale You Be Mine?  I stamped the images directly on the card front in Memento black ink, and then colored in the images with my alcohol markers.  I cut simple strips of patterned paper and glitter paper from my stash and glued them to the front and trimmed them to fit.   


Next, I cropped the bottom edges of each card with my Corner Chomper.  I like the look of that on a smaller card, it feels like a nice little finished detail with very little effort.  I stamped a sentiment on the inside of each card and also glued a piece of patterned paper on the top to hide the bleed through from the alcohol markers.  

In about 90 minutes I was able to finish 8 cards!  I already have a few others in my stash from other card making days, so I'm about halfway through making my Valentine cards now!  


Are you guys making Valentines this year?  What are your favorite Valentine stamps?  Leave me your favorites in the comments below!  

Saturday, January 23, 2021

Skillshare Class - Build Your Own Doodle Library

 One of the things that is advertised to me almost every time I'm on YouTube is Skillshare.  I was skeptical at first, and then after hearing about all of the classes they offered, I figured I'd grab a free trial and try it out.  Now, I'm hooked!  I've watched some classes on bullet journaling, and have started a few on watercoloring and illustration. The first class I've really done completely, with projects and all, is this class on doodling. 

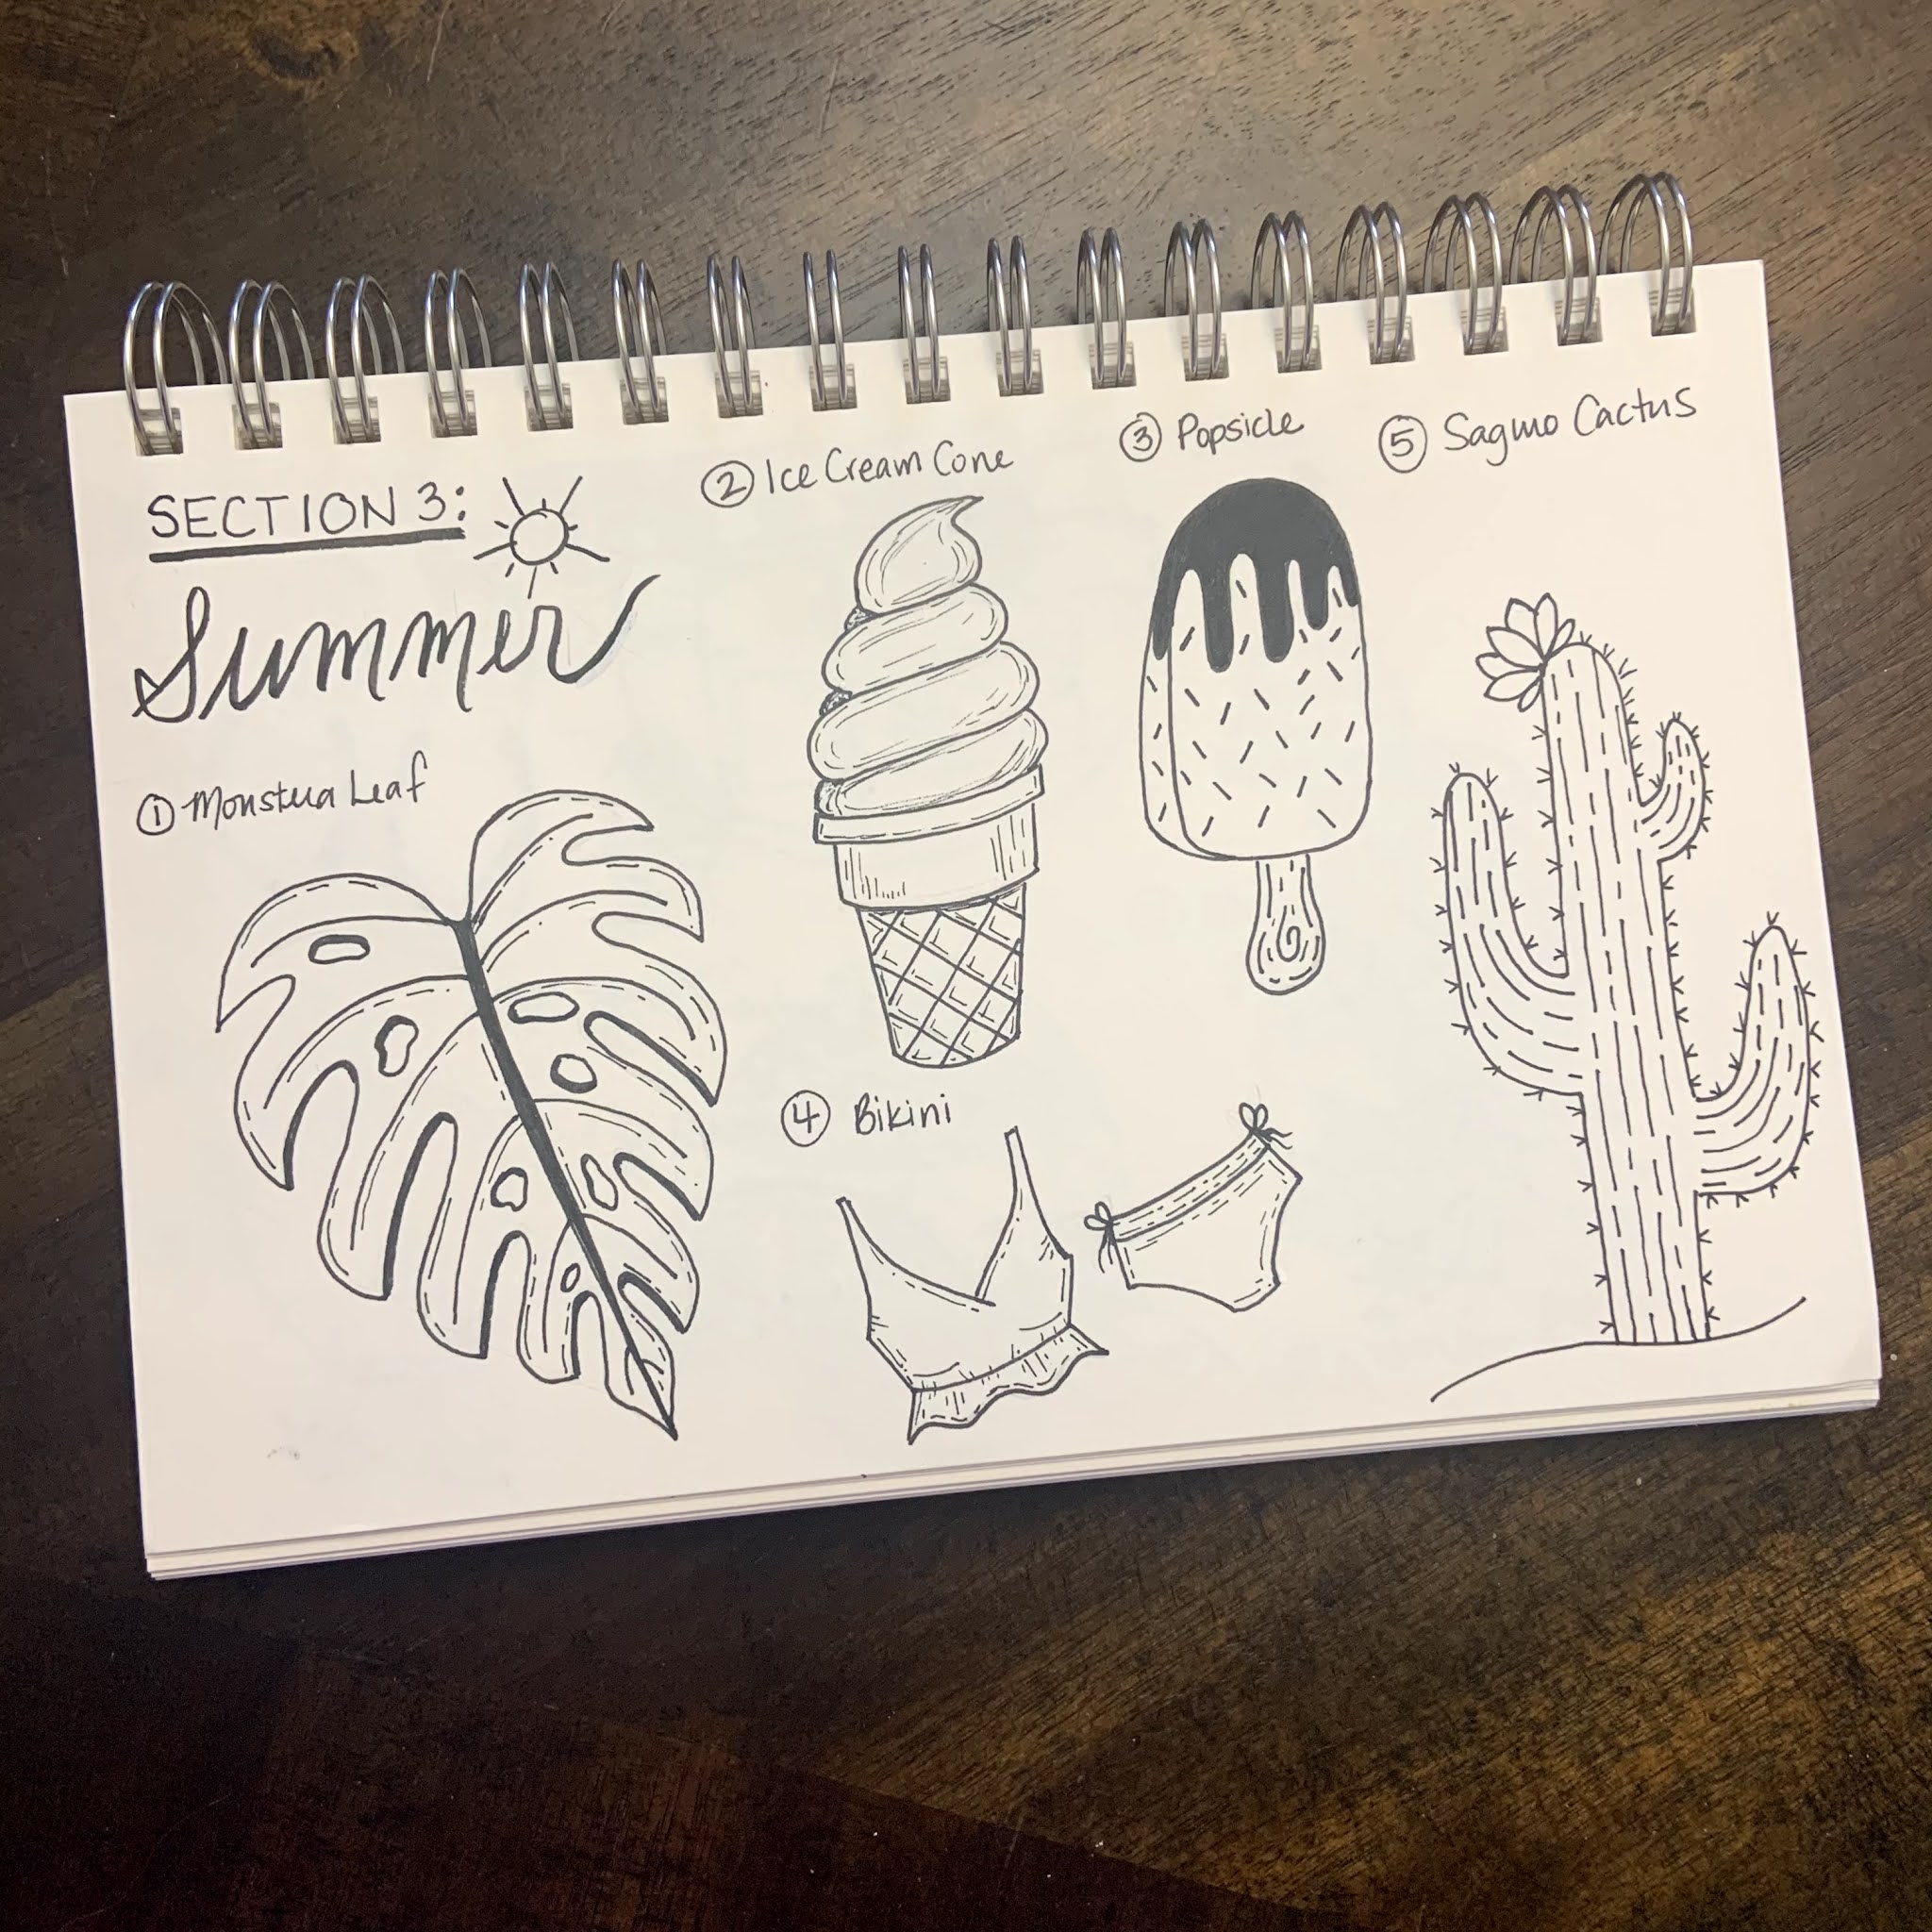
Somewhere along the way of becoming an adult, I quit doodling.  As I have rediscovered the artsy side of myself in the past 2 years, one of the areas that I lacked confidence has been line work. I took this class as a way to improve my line work and my ability to detail a simple drawing.  Pooja's class was a wonderful exploration of these exact things and even encouraged us to do 10 pencil-less doodles at the end of the class. That, was a challenge but I enjoyed it!  The idea of this is to have your own clip art library at the end of the class. And while I'm not going to keep all of these images for that purpose, having a bunch of them that I can scan and play with in procreate sounds absolutely amazing!  

These pictures are far from perfect, but several of them are WAY better than what I would have expected from myself even 2 months ago!  I mean, look at that monstera leaf!!! I was particularly proud of that one!  

I also am doodling my way through this class a second time with my 7 year old daughter!  She saw me taking the class, and she immediately wanted to try it!  I might share her progress here in the future - but she is really learning a ton too.  This really is a class for anyone and everyone!  I'm just going to post a few of my favorite pages here, the full flipthrough will be in my Instastories highlight reel!  If you've ever thought about Skillshare before I'd highly recommend giving it a try!  I'm pretty sure the website offers you a 1 week free trial, but if you want a longer free trial, go find an art YouTuber and get their code. 

Also, if you aren't following Pooja and her art on instagram - you should be!  You can find her at @by_the_lakeside.  Thanks again Pooja for your amazing class - I cannot wait to work through many of your watercolor classes as well! 

Tuesday, January 19, 2021

DIY Gansai Tambi Storage and Palette

If you go back a few blog entries, you will see that I invested in the Holiday Sketchbox for 2020. That Sketchbox came with lots of fun goodies, but one of them that I keep going back to play with were a set of 6 Gansai Tambi paints.  I found that these paints were different than my other watercolors, but that I really liked them!  I wanted to be able to use these more broadly, and so I ended up using a birthday gift card to pick up an original set of 18 Gansai Tambi colors, so I would end up with a unique set of 24.  

Immediately, I realized that I LOVE the large pans! I'm having fun learning with them, but I wanted all 24 in one place.  I also really didn't like the paper washi boxes as storage.  While they were beautiful, I need something that isn't going to dissolve when I get it wet because I'm definitely messy.  I also wanted something that would have an included mixing palette, and so I went searching on the internet. 

And I searched, and I searched, and I searched, and I couldn't find something that fit the unique size of these paints and that had a palette.  

SO - I made my own!  Here are the steps I took to make this palette.  I hope this helps someone else out there who might be having the same problem with their Gansai Tambi (GT) paints!  

Step 1: Planning and Measurement

I wanted a thin, metal tin that could house the paints.  I looked at several different options before deciding that a colored pencil tin would be the best option!  I had 24 paints measuring 1" by 2.5", so I needed something that would cover 60 square inches BUT that would also fit the paints correctly.  I ended up with this pencil tin, which was about 82.5 square inches and would be able to fit a total of 33 pans of GT paint, giving me some wiggle room to expand my collection in the future but keeping the size reasonable: 

**Note: Don't worry, these pencils were moved to a pencil case and my daughter was absolutely OVER THE MOON to get a brand new set of watercolor pencils!  Once she swatches them and plays with them I'll let you know what we think!  If I had a spare pencil tin that worked I would have used that instead!  

Step 2: Making the Palette Lid

I bought some high gloss white enamel spray paint.  I sprayed the lid 3 times using the directions on the paint can, and then let the paint dry for a solid 24-36 hours.  Then I fit the lid onto the tin several times to make sure everything fit.  There was slight peeling in the inner corners of the palette that I may seal over time, but for right now I doesn't seem to be causing any problems.  I included a picture showing how nice, white and shiny the lid looks!  

Painted Lid - After Drying

See How Shiny?!?!?!


Step 3: Assembling the Palette

Next, I bought some magnets that are meant to fit on the bottom of watercolor half pans, and I attached them to the middle of the GT paint pans.  I took a sharpie and wrote the number of each paint on the bottom as well since I was going to cover it with the magnets.  You could definitely use stronger magnets, but for my purposes I just needed them to hold the paints in place and not necessarily pass an earthquake test.  I probably wouldn't take this palette on a vacation with me, but it will be nice and easy to move around various parts of my house or over to a friends house eventually.  

I placed the paints in the color order that I prefer, and I kept the plastic piece from the set of 18 just to give some protection from the top palette.  I also made a swatch card that will fit into the tin as well.  Then, I cut up a sponge and used tape to fit it into the side of the tin to keep the paints from moving and to be used with a waterbrush.  

There is still room to fit another whole row at the bottom of the tin, and if I removed the sponge I could fit 3 extra paints along that side comfortably.  

Step 4: Final Touches

I'm keeping a water brush and a roll of washi tape in here for now because I have the space.  I'm also using stickers to cover the top of the tin to customize the palette, but you could definitely paint the top if you prefer!  I'm super happy with how this has turned out and was glad that my DIY worked to solve a problem!  

All Finished!  

Everything Put Together Without the Lid

Final Notes:  This solution has worked really well for me.  It keeps my paints in one place and allows me to move around easily while still having a mixing palette!  As far as cost goes, I paid about $20 for the tin (including the pencils!), $4 for the paint, and I had the magnets but you could buy them on amazon for $6-7.  So for under $30, I made the solution I wanted and I'm very happy with it!  


Do you have Gansai Tambi paints?  How do you store them? Let me know in the comments!