Saturday, January 30, 2021

Etchr Sketchbook Review - The Paper of my Dreams!

I have wanted to try these sketchbooks from Etchr for awhile, and I was so excited to get them for Christmas from my lovely husband!  These are the Etchr Cold Press Mixed Media Sketchbooks in A4, A5 and A6. 

2 of the 3 Sketchbooks

These sketchbooks are thinner than traditional watercolor paper at 230gsm, BUT they are 100% cotton watercolor paper and claim to be double-sided!  This all seemed too good to be true, 100% thin cotton paper that lays flat and was ALSO double sided?  Could it be true?  

So, my first test was to see how flat the book lays.  I must say, for a hard-bound sketchbook that the paper does lay *very* flat.  It's not as flat as a wire-bound sketchbook, but with binder clips or washi tape I don't have any problem working in these sketchbooks.

My second test was to see how well the 100% cotton paper performed with wet on wet techniques and blending.  Succulents are my comfort zone when it comes to watercolor painting, and so I used this succulent picture as my test.  I was IMMEDIATELY in LOVE. This paper stays wet a long time for beautiful blending, and doesn't unexpectedly lift or pill under multiple layers.  I had two more tests to check the paper's abilities, but so far I was SUPER impressed!  

My third test was to see how well this paper did with a full background wash.  I did not hold back to wet the background.  I also had the edges taped like I would for any wet technique in a sketchbook, but the warping was minimal considering the thinness of the paper.   The washes went on beautifully and create beautiful gradients.  The second picture took 5 layers, all washes and there was no pilling or unexpected lifting.  The more I use this paper, the more I LOVE it!!!  


My final test of the paper was to use both sides.  I specifically wanted to use two pages with serious washes on both of them to see what would happen. As you can see in this video below, there was absolutely NO ghosting, bleeding, anything!!!  IT IS MAGIC. I mean, HOW they managed to make this paper has to be sorcery!  Also - this video shows a small sneak peak of a few other pieces I haven't shared yet!  


So the question becomes, is it worth the price?  In my opinion, they are ABSOLUTELY worth the price!  Per book, they aren't much more than the Bee Creative books that I buy, AND they are hard bound and the paper is double-sided!  Also, Etchr now sells individual books on Amazon so you don't have to buy 3 at a time!  For a long time, having to buy 3 books deterred me from buying them for myself, but now being able to buy 1 to try I wouldn't hesitate AND I feel they are definitely worth the money!  

Needless to say, this paper has 10/10 stars from me.  It will most likely be my primary watercolor sketchbook going forward.  I love working on paper that works like Arches or Bee in a beautiful, bound, easy to carry sketchbook.  I *have* seen that Etchr has paper blocks, but to my knowledge those blocks are only 50% cotton. I'm really hoping they will make 100% cotton cold press blocks in the future - I would DEFINITELY trust this company to make quality 100% cotton blocks!!!  

I hope this review was helpful to anyone that is thinking about trying this product!  Have you tried any Etchr products?  Let me know your thoughts in the comments!  

Wednesday, January 27, 2021

Quick and Easy Valentines Part 2!

This past weekend, my lovely daughter and I sat down in our craft room to get inky and make some Valentines!  

I know a lot of people dislike Valentine's Day, but truthfully I've always looked at it as a day share the love with everyone in my life!  I usually make about 20 valentines to send to friends and family. Because of the proximity of Valentine's Day to Christmas, I never want to make anything that is TOO complicated when it comes to these cards!  So these cards are all very similar, small, and clean in design.  

Another note about these projects - everything I'm using here is at least 5 years old!  I love my Valentine's stash and I've been using the same one I stocked YEARS ago - so please feel free to use what you have!!!  I'm really trying to not spend much money this year on paper crafting and to focus on finding love in the products that I have!  


These cards are 4-bar size.  I used two Lawn Fawn sets that I enjoy: My Silly Valentine and Whale You Be Mine?  I stamped the images directly on the card front in Memento black ink, and then colored in the images with my alcohol markers.  I cut simple strips of patterned paper and glitter paper from my stash and glued them to the front and trimmed them to fit.   


Next, I cropped the bottom edges of each card with my Corner Chomper.  I like the look of that on a smaller card, it feels like a nice little finished detail with very little effort.  I stamped a sentiment on the inside of each card and also glued a piece of patterned paper on the top to hide the bleed through from the alcohol markers.  

In about 90 minutes I was able to finish 8 cards!  I already have a few others in my stash from other card making days, so I'm about halfway through making my Valentine cards now!  


Are you guys making Valentines this year?  What are your favorite Valentine stamps?  Leave me your favorites in the comments below!  

Saturday, January 23, 2021

Skillshare Class - Build Your Own Doodle Library

 One of the things that is advertised to me almost every time I'm on YouTube is Skillshare.  I was skeptical at first, and then after hearing about all of the classes they offered, I figured I'd grab a free trial and try it out.  Now, I'm hooked!  I've watched some classes on bullet journaling, and have started a few on watercoloring and illustration. The first class I've really done completely, with projects and all, is this class on doodling. 

Somewhere along the way of becoming an adult, I quit doodling.  As I have rediscovered the artsy side of myself in the past 2 years, one of the areas that I lacked confidence has been line work. I took this class as a way to improve my line work and my ability to detail a simple drawing.  Pooja's class was a wonderful exploration of these exact things and even encouraged us to do 10 pencil-less doodles at the end of the class. That, was a challenge but I enjoyed it!  The idea of this is to have your own clip art library at the end of the class. And while I'm not going to keep all of these images for that purpose, having a bunch of them that I can scan and play with in procreate sounds absolutely amazing!  

These pictures are far from perfect, but several of them are WAY better than what I would have expected from myself even 2 months ago!  I mean, look at that monstera leaf!!! I was particularly proud of that one!  

I also am doodling my way through this class a second time with my 7 year old daughter!  She saw me taking the class, and she immediately wanted to try it!  I might share her progress here in the future - but she is really learning a ton too.  This really is a class for anyone and everyone!  I'm just going to post a few of my favorite pages here, the full flipthrough will be in my Instastories highlight reel!  If you've ever thought about Skillshare before I'd highly recommend giving it a try!  I'm pretty sure the website offers you a 1 week free trial, but if you want a longer free trial, go find an art YouTuber and get their code. 

Also, if you aren't following Pooja and her art on instagram - you should be!  You can find her at @by_the_lakeside.  Thanks again Pooja for your amazing class - I cannot wait to work through many of your watercolor classes as well! 

Tuesday, January 19, 2021

DIY Gansai Tambi Storage and Palette

If you go back a few blog entries, you will see that I invested in the Holiday Sketchbox for 2020. That Sketchbox came with lots of fun goodies, but one of them that I keep going back to play with were a set of 6 Gansai Tambi paints.  I found that these paints were different than my other watercolors, but that I really liked them!  I wanted to be able to use these more broadly, and so I ended up using a birthday gift card to pick up an original set of 18 Gansai Tambi colors, so I would end up with a unique set of 24.  

Immediately, I realized that I LOVE the large pans! I'm having fun learning with them, but I wanted all 24 in one place.  I also really didn't like the paper washi boxes as storage.  While they were beautiful, I need something that isn't going to dissolve when I get it wet because I'm definitely messy.  I also wanted something that would have an included mixing palette, and so I went searching on the internet. 

And I searched, and I searched, and I searched, and I couldn't find something that fit the unique size of these paints and that had a palette.  

SO - I made my own!  Here are the steps I took to make this palette.  I hope this helps someone else out there who might be having the same problem with their Gansai Tambi (GT) paints!  

Step 1: Planning and Measurement

I wanted a thin, metal tin that could house the paints.  I looked at several different options before deciding that a colored pencil tin would be the best option!  I had 24 paints measuring 1" by 2.5", so I needed something that would cover 60 square inches BUT that would also fit the paints correctly.  I ended up with this pencil tin, which was about 82.5 square inches and would be able to fit a total of 33 pans of GT paint, giving me some wiggle room to expand my collection in the future but keeping the size reasonable: 

**Note: Don't worry, these pencils were moved to a pencil case and my daughter was absolutely OVER THE MOON to get a brand new set of watercolor pencils!  Once she swatches them and plays with them I'll let you know what we think!  If I had a spare pencil tin that worked I would have used that instead!  

Step 2: Making the Palette Lid

I bought some high gloss white enamel spray paint.  I sprayed the lid 3 times using the directions on the paint can, and then let the paint dry for a solid 24-36 hours.  Then I fit the lid onto the tin several times to make sure everything fit.  There was slight peeling in the inner corners of the palette that I may seal over time, but for right now I doesn't seem to be causing any problems.  I included a picture showing how nice, white and shiny the lid looks!  

Painted Lid - After Drying

See How Shiny?!?!?!


Step 3: Assembling the Palette

Next, I bought some magnets that are meant to fit on the bottom of watercolor half pans, and I attached them to the middle of the GT paint pans.  I took a sharpie and wrote the number of each paint on the bottom as well since I was going to cover it with the magnets.  You could definitely use stronger magnets, but for my purposes I just needed them to hold the paints in place and not necessarily pass an earthquake test.  I probably wouldn't take this palette on a vacation with me, but it will be nice and easy to move around various parts of my house or over to a friends house eventually.  

I placed the paints in the color order that I prefer, and I kept the plastic piece from the set of 18 just to give some protection from the top palette.  I also made a swatch card that will fit into the tin as well.  Then, I cut up a sponge and used tape to fit it into the side of the tin to keep the paints from moving and to be used with a waterbrush.  

There is still room to fit another whole row at the bottom of the tin, and if I removed the sponge I could fit 3 extra paints along that side comfortably.  

Step 4: Final Touches

I'm keeping a water brush and a roll of washi tape in here for now because I have the space.  I'm also using stickers to cover the top of the tin to customize the palette, but you could definitely paint the top if you prefer!  I'm super happy with how this has turned out and was glad that my DIY worked to solve a problem!  

All Finished!  

Everything Put Together Without the Lid

Final Notes:  This solution has worked really well for me.  It keeps my paints in one place and allows me to move around easily while still having a mixing palette!  As far as cost goes, I paid about $20 for the tin (including the pencils!), $4 for the paint, and I had the magnets but you could buy them on amazon for $6-7.  So for under $30, I made the solution I wanted and I'm very happy with it!  


Do you have Gansai Tambi paints?  How do you store them? Let me know in the comments!  

Saturday, January 16, 2021

January Sketchbox - All About Ink

It's Sketchbox time!  When I opened up this box I was excited and scared all at once because it was all about INK:  

I'll admit that at first glance, I was very excited by the fact that we had three primary colors AND a boss looking fine liner to start out with.  PLUS, the paper looked to be quality as usual, so I was excited!  

I ended up having a LOT of fun and mixing some really vibrant colors, and ended up with this Yoshi:  


He isn't my best work by any stretch, but after a LOT of struggle he turned out better than expected.  

I'll start by laying out the contents of the box and what I thought of each item:  

Swatches

Color Mixes from the Inks
1.  Sketchbox Signature Plastic Palette
This was a perfect little palette to accompany these products.  As shown above, it allowed for secondary mixes and cleaned easily after the project.  I love having little palettes like this around my art space for all sorts of wet media projects.  

2.  Caran d'Ache Grafwood Pencil, 3H
This pencil was a fabulous surprise in this box!  I've never used fancy pencils before (always just been an HB girl), and so I found that I absolutely LOVE sketching with this pencil!  I've already used it to sketch several other pieces and it's got a home in my main stationary bag.  This was a great item!  

3. Dynasty Dagger Brush, 3/8"
I found this to be a very high quality dagger brush, better than the one I've been currently using! For the size of the paper pad, this brush seemed a little bit large at times, but the pointed end did allow for a decent amount of detail.  I will say that having this size of a brush made me think that this in should be able to lay down large wet on wet areas, which I found to be very frustrating with this paper/ink combo.  

4. Staedtler Pigment Liner, 0.3 - 2.0mm
Again, another fabulous addition to this box.  I loved the chisel tip on this liner and thought it worked fabulously.  I did have smudging in a few spots but that was because of my own impatience!  Overall, this liner layed beautifully down on top of the inks and didn't bleed if you let it dry before applying water overtop.  

5. Inks: 
Holbein Acrylic Ink, Naphthol Red 
Speedball Acrylic Calligraphy Inks, Primrose Yellow and Indigo Blue

I greatly preferred the packaging of the Holbein ink, and felt like I wasted way more of the other ink by having to use and clean droppers to put it into the palette. In all other ways I felt the inks could be talked about together.  

When I saw these colors I was SO excited, because they were vibrant and I knew I could get good mixes with them!  They did not disappoint in that department.  HOWEVER, as someone that works primarily with watercolor, I had a hard time with these inks on this paper.  If you layed down color, it DID NOT MOVE.  And yes, they are inks, it's to be expected.  BUT, I wanted to get gradients or looks that were a little more muted and so I watered down the inks to achieve this.  That *seemed* great until I realized that the inks were feathering on the paper WILDLY.  So, if I put them straight onto the paper I got really bold colors with very little buildup ability, and if I used water to lighten the colors I had much less control than what I wanted.  If you look at Yoshi, you can see that on his back there was definite feathering.  I even ended up using a white posca pen to cover over the white details to make them look cleaner in the end.  I don't usually do that but I was too far into the piece to start again and I knew using a Posca would fix the feathering issue.  I am not faulting the inks for this, but the paper.  

6. Magnani Cotton Pad, 140lb Cold Pressed
This paper seems AMAZING for typical watercolor and I'm excited to try it for that purpose in the future.  But I really REALLY think with the supplies that we were given that we should have been given either hot pressed paper or mixed media paper.   This would have slowed down the absorption of the inks on the paper and allowed for watery ink mixes to be applied with more control.   This Yoshi was my second attempt at a picture and I do not think this paper made working with the acrylic inks "fast and easy" as described by Sketchbox.  

**UPDATE** - I tried this paper with my watercolors and also had HUGE feathering issues with wet on wet techniques involving layers. It still feathered after letting the paper dry for a really long time, and so I think that I either got a bad paper pad OR that there is something wrong with this paper.  I watched several videos where people did not seem to have a problem with the paper, so I'm wondering if it's just my pad.  

Overall, I do feel like box was worth my money and I'm looking forward to using these inks with a calligraphy pen for fun AND maybe on some different types of paper to see what I can do!  I'll use the watercolor paper, pencil, liner, brush and palette for other projects too, so this box will definitely get plenty of use in this house!  My daughter did a picture too where she used a much more pigmented version of each color and I love how her rainbow/pot of gold/sun picture turned out!  Here is her piece, posted with her permission:

We always have a lot of fun working together on these boxes, so thank you Sketchbox for another fun challenge!  

What would you have drawn with these supplies?  Do you think I should redo Yoshi on a different paper?  Let me know in the comments below!  

Tuesday, January 12, 2021

2021 Plans and Quick Valentines

 Happy Tuesday readers!  

I started this blog last year as a way to have a place to expand on my artsy Instagram endeavors.  With that, I've been doing art box and product reviews and showcasing certain ideas and tutorials and I've been having a blast!  So I've decided to set up a more structured posting schedule!!!  

When will you post? Every Tuesday and Saturday! 

What will you post? They will include, but not be limited to: 

  • Bullet Journal Journey
  • Sketchbox reviews
  • Other supply reviews
  • Tutorials for watercolors or cardmaking
  • DIY Projects
So I'm really looking forward to this as we go forward!  I hope you will visit on Tuesdays and Saturdays and check out what we have to offer!  

And now, onto the quick Valentines post!  

I made these cards last year and wanted to share a way to stretch your valentines stamps while also using them to make an easy card!  

I love small, clean and simple cards sometimes, and so I'm a big fan of 4-bar envelopes.  These cards were created to fit into 4 bar envelopes, but you could just as easily apply the concept to a traditional A2 sized card.  For my purposes, I cut out three strips of cardstock that were 3.5" by 8.5" and scored them to make 3 cards that are 3.5" by 4.25".  

I used my favorite Valentine sentiment stamp set from Lawn Fawn - My Silly Valentine.  I have gotten so much use out of this one stamp set over the years!  If you have any stamp set with love sentiments on it though, you can make it work! 

Next, I colored in my images very simply and used a solid colored piece of grosgrain ribbon across the bottom as a finishing touch.  Then I cropped the bottom edges of the card for a rounded look and took a scrap piece of patterned paper and glued it inside to finish the top inside edge.  I love doing this on a card and think it's a simple technique that really makes the card looked finished. 

The thing I like best about this card is that it is subtle.  I didn't use a TON of red and pink and chose a sentiment that could apply anytime of year as a thinking of you card.  These cards churn out quickly and easily and you can save them for anytime of year if you don't send them all in February!  I absolutely love having quick, flat, easy to mail cards at any time of year!  

One last thing, I'm only linking this stamp set because it's one I've used over and over again and it's very versatile in my opinion.  If you have supplies that can work with this, please use what you have!  I'm going to try this year to be more mindful of using the supplies that are already in my stash instead of buying new ones every month.  

I hope you enjoyed this short, easy card tutorial!  What are your favorite go-to quick cardmaking supplies?  

Friday, January 8, 2021

Christmas and Birthday Art Supply Haul!

Because my birthday is the same week as Christmas, I end up with quite the haul by the end of December!  This year, I asked for a lot of art stuff that I won't buy myself but that I knew I really wanted to try!  

***Disclaimer: I know that I'm extremely fortunate to have people in my life that support my hobby and buy me artsy things.  This is not meant to show off or brag, I just simply want to showcase some of the artists, authors, and companies that I am excited to learn from and test out in the upcoming year.***

Here are all of the supplies I ended up with:  

1. Etchr Cold Press Watercolor Sketchbooks


So I have to say, my husband knocked it out of the park!  He always gives great gifts, but this year he got me some fab art supplies that I wouldn't have bought myself.  I have wanted to try these books for almost a year now.  This was a 3 pack variety set, and you will notice that the picture is missing one because I already opened it and started painting in it!  So far, I'm in love!  These sketchbooks are really quality and seem to be exactly what I was looking for in a watercolor sketchbook.  

2. Prismacolor Col-Erase Pencils


I have a nice set of Prismacolors that I've been enjoying for many years, but I really wanted to buy and try the Col-Erase pencils!  My parents got me this set, and I think I swatched them within 24 hours!  They are vibrant and blend beautifully and they ERASE so cleanly!  I know that's what they are supposed to do, but I definitely was surprised at how well they work.  I also think the color selection is exactly perfect for a 24 set and matches my paint palettes beautifully.  I'm very excited to play with these more! 

3. Posca Pens


These were a beautiful surprise!  I have a set of less expensive paint pens that I enjoy using, and I have gotten a few posca pens here and there in art boxes.  I love the vibrant colors in this posca set, and these have small nibs for details!  Since my bullet journal is thick paper that can handle paint pens, I'm very excited to start using these in my monthly layouts!  

4. Artist Books


Anyone that knows me knows that I LOVE to read, and so I've been staring at several art books online for the past year, thinking I'd get around to buying them eventually.  My parents and sister/bro in law bought me THREE new art books and I've already been pouring over them, learning so much!  I also bought one with a birthday gift card that is set to arrive in January.  The art books I got were: 
  • Draw With Jazza - Creating Characters: Fun and Easy Guide to Drawing Cartoons and Comics by Josiah Brooks
  • Everyday Watercolor: Learn to Paint Watercolor in 30 Days by Jenna Rainey
  • The Joy of Watercolor: 40 Happy Lessons for Painting the World Around You by Emma Block
  • No-Fail Watercolor: The Ultimate Beginner’s Guide to Painting with Confidence by Mako
Now, it might seem strange that I wanted all of these beginner books.  But let me start by saying that I still consider myself a beginner in my art journey!  I also think that since I've never had any formal training with painting or drawing that books like this are great ways to learn basics or revisit skills that I might want to try to refine.  As a teacher myself I'm a firm believer that we can always learn something new, and so I'm really excited to work through these 4 books over the next few years.  So far, I have tried one tutorial from the Emma Block book and it was awesome!  

5.  Travel Paintbrushes

My genuine hope is that in 2021 we can actually go on a vacation again or do fun things!  Right now, my travel art supplies never go anywhere because I'm always home, BUT I'm so excited to get a chance to use these travel brushes!  It's a wonderfully high quality set that has all of the round brush sizes I love!  I'm so excited to have this set!  


6.  Tombow Calligraphy Pens

I love these pens!  I have several of them and I'm always excited to get more of them.  These are my favorite liner pens, I like the bold tips and I feel like I get better lines than I would from a traditional fineliner.  They also work really well with watercolors and so I like not having to worry about bleeding when I use these over or under watercolor.  

7.  HANDMADE WATERCOLORS!!!  

Again, my husband TOTALLY surprised me with a set of handmade watercolors from Greenleaf and Blueberry!  They are SO pigmented and he bought me a beautiful set for landscapes and muted tones!  I would never have tried these on my own because they are pricey, but they are amazing! 

I swatched them and did a landscape picture with them (I literally couldn't wait to paint trees with that Pthalo Green!).  Here's the picture below done in one of my Etchr books: 


So I hope that you enjoyed this tour through my new art supplies!  As I get familiar with some of them, expect to see reviews on some of these.  Did any of you get new supplies or books for the holidays?  Let me know in the comments!  

Saturday, January 2, 2021

2021 Bullet Journal Journey - January

Happy New Year!!!  I've been so excited to share with you my 2021 bullet journal!!!  I decided after last year to jump into bullet journaling with a blank journal this year after my year with the blank calendar format from 2020.  I did a LOT of research, and decided to go with a book from Archer and Olive.  It has thick pages that hold up to just about any type of brush marker or paint pen, which gives me a LOT of options to decorate the journal.  Here is the one I picked out:  

I've decided that for each month, I'm going to start with the following basic format: 

- Month intro and goals spread

- Monthly calendar spread

- Monthly mood tracker and budget spread

- Weekly spreads with a spot for notes and menu planning

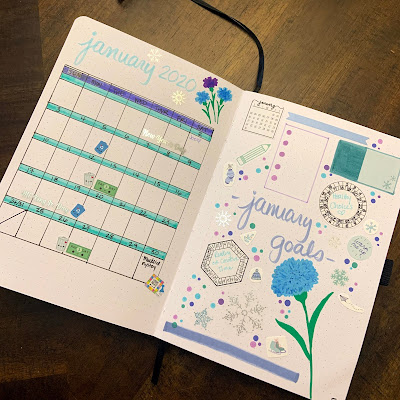
For January, I went with a cool, blue/purple theme.  I also miscalculated my pages and so I ended up combining the calendar and monthly goals spread.  It turned out really nice, but the calendar is definitely smaller than I'd like and I'll fix that in upcoming months:  


I really enjoyed using my mildliners, clean color dot pens, and posca pens to create these pages!  I'm also looking forward to trying out several weekly spreads to see which type works best for me in this journal.  Last January, my mood tracker was a scarf on a snowman, and so I thought this cozy hat would make a cute mood tracker for this year!!!  I can't wait to see it once it's finished!  I also really missed out on adding a watercolor strip to this month.  I could still add one under the January calendar.... we shall see.  But overall I love the thick pages of this journal and how easy it is to format.  
Are any of you taking the bullet journal journey this year?  Let me know how you formal yours in the comments!